Showing posts with label the inlightin workshop. Show all posts

3.26.2013

Light Painting - Example

I cannot for the life of me think of why I haven't done light painting before. I believe the first time I actually tried it was when I was in Joshua Tree National Park doing some star trails. The foreground needed some light so I used a flash light to expose them. Fast forward to 2012 and I brought it back to the table for some of my wedding clients.


How To - Light Painting Examples by the inLIGHTin Workshop


Here's what I used to get this shot: 
- Nikon D800 Digital SLR Camera
- Nikon 35mm f/2.0 Lens
- Nikon SB-900 Speedlight
- Tripod (any will do really)
- iPhone & Flashlight Type App.
- A dark place.
- A subject(s) that will stand still.

The camera settings are open to interpretation based on where you are. I played with my ISO between 200-400. My aperture was around f/8 and my shutter speed was very slow, around 10-15 seconds until I had something worth while.

The main concept for properly exposing the shot is: 
  1. You need stop down the aperture and low ISO so that the light you paint with just tickles the subject. If you are wide open then one hit of the flash will flood your shot.
  2. You use your speedlight in manual mode off camera and do a "test fire" so the flash hits your subject. Do this to taste.One hit may be all you need while other times you may need. Other times, you can pop a couple behind your subject. f-stops around f/8 and f/16 start to show this awesome starburst effect with light that can be really cool.
  3.  The shutter speed needs to be slow so that you can run around and paint with a continuous light source. In my case, I had my iPhone and some flashlight app that changed my screen color. What you see ghosted in the background is just the light emitting from my iPhone as I ran around my bride and groom. The exposure was so long that I didn't get picked up however. Be creative, you can use whatever continuous light source you want. Even rope lights and kid toys.
  4. Always be moving when running through the frame. If you are slow or your flash hits you then you will show up in the shot. Otherwise, with such a long shutter speed you shouldn't even show up.
  5. You need to have your camera on a tripod. I set my camera to a 5 second timer so I can get prepared to run around like a crazed lunatic.
  6. Your subject HAS to be standing still. If they move, that slow shutter speed will surely pick it up and then you have to re-do the shot. Try to shoot while it's warm out because even cold shivers can get picked up.
  7. TRY AND PRACTICE BEFORE YOU TAKE IT TO A SHOOT. No client feels comfortable when you are fiddling with gear and not able to make the shot after you hyped it up.
That should be all. Thanks for your support.
Comment if you have any questions.
~ Michael

inLIGHTin'ed Storefront Updated

... and look at the prices!!! Consider it a thank you sale for your patience. I've received numerous emails asking about the store and why they can't buy anything from it anymore.
Head on over to the Store and pick up whatever you want at ridiculous prices: http://www.inlightinworkshop.com/p/store.html Thanks for your support! ~ Michael

Follow The Wedding Photography Inspration Guide

Follow The Wedding Photography Inspiration Guide on all the Social Media Outlets for the latest info. Each site will have different freebies, goodies and contests and all that sweetness.

Twitter: Follow @WeddingPhotoApp
Facebook: Wedding Photography Inspiration Guide Fan Page
Google+: Wedding Photography Inspiration Guide on Google+

Thanks for your support. Two more days until it's up on the App Store! Exciting times.
Michael

12.26.2012

How To Fake a Backdrop With Flash

Do you fancy those dim lit portraits with the subject's face lit and surrounded by darkness? I'll be you think you need a professional studio, backdrop and a ton of fancy lighting to achieve that same effect huh?

If you know anything about flash photography then you already know that you an fake a black backdrop... But did you know you can fake it even outdoors on a sunny day?


How to simulate a black backdrop even outdoors on a sunny day.
 All you need is your camera, external flash (a speedlight will do) and a light stand.

All you have to do is shut out as much ambient light as humanly possible. Once you have your black ("under exposed") image then you are ready to use your flash to illuminate only what you want to add back in. You are essentially overpowering the ambient light with your flash.

You'll need a camera that has a manual mode. You must be able to control the ISO, shutter speed and aperture to achieve the desired results. Your flash also needs to have manual controls so you can adjust the intensity of the flash.

With the flash being off-camera, you'll also need a way to trigger it... You have a couple options here:
- Hot shoe extension cable.
- Wireless trigger: The PocketWizards are the best money can buy. It opens up a whole new world for you and off-camera flash photography.
- Your Camera & flash's built in slave. That is one of the many reasons I love Nikon. They have made it so easy to fire your Nikon brand flash using only the pop-up flash on your camera to trigger it. My Nikon D800 and Nikon SB-900 work great together.

Now that we have gear covered, let's get into the technique...

First, set your camera's ISO as low as you can. This setting comes from the good ol' film days where you had to buy film with ISOs that were suited for what you were going to take pictures of. ISO 100 was for extreme daylight while higher numbers like ISO 800 or 1600+ were for indoor, dark locations. Using an ISO like 100 means that it will take a lot of light to expose the image. ISO 1600+ need less light to expose the image. For our needs, we want it to be really tough for ambient light to affect our exposure.

 the shutter speed needs to play nicely with your flash. Although the two really don't have any effect on one another you do need to be wary of your camera's flash sync speed. This is typically 1/200" or 1/250" on most cameras. Refer to your camera manual for that info. If you go higher than this sync speed then you will notice a black bar affecting your image. This is from the shutter closing before the flash has time to fully fire.

I leave the aperture last because this setting IS something your flash works with. The aperture is the opening in which the light enters while the shutter speed is the duration of how long that light gets let in... The lower the f-stop (f/4, f/2.8), the bigger the opening and thus the more light gets let in. The higher the f-stop (i.e. f/8, f/16) the smaller the opening so less light enters.

I would recommend your camera to be set to ISO 100, 1/200" and f/5.6 as a starting point... This is a definite balancing act. We are probably maxing out the ISO and shutter speed due to camera and flash sync limitations.* The only things we can tweak now are the aperture and flash settings.

 * fun fact: The Nikon D70 has a 6mp sensor but has an electronic shutter with a flash sync speed of 1/500"! You better believe I own one of these cameras.

Take a test shot without a flash. If your test shot still shows some background and ambient light then the only thing you can do is raise the aperture to f/8, f/11, f/16, etc. As a last resort you can find a little shadier spot to position your subject in. That little bit of shade could be the difference you need.

Now that you have successfully killed the ambient light, it is time to incorporate the flash. You cannot change the settings of your camera at this point. You have locked down your settings to achieve essentially your black backdrop.

The flash has 4 things that can affect it's impact on an image. Two are camera settings and two are flash settings:
- The ISO
- The Aperture
- The flash's power
- The flash's distance to subject

We have ISO and Aperture locked down so we can only control the flash's power and distance between flash and subject.

Put the flash an arm length or two away from your subject to start and then dial the flash's manual power up or down until you have the right intensity of light. Once again, the flash should be in manual mode and you should be working with flash power that is something like 1/1, 1/2, 1/4, 1/8, 1/16, etc...

You will see in the image above that a soft box was used outdoors to literally soften up the light. This also helps to wrap the light somewhat around your subject's face instead of just being harsh with a hard stop between shadow and highlight.

Also, notice the position of the flash. It is on the opposite side of where I am taking the picture and "fanned" out to help with that wrapping of the light around their face.

Feel free to try the same thing indoors. If you don't have a flash then you could always experiment with window light, reflectors and stuff of that nature...

Thanks for stopping by.
~ Michael

6.22.2012

Back To The Ol' Drawing Board

Hey, longtime inLIGHTin'ed followers, remember waaaaaayyyyyy back when I said I was going to be publishing some eZines ?

Well good news, I finally got around to do that not too long ago. The only bad news is that I am going back to the drawing board. First, it is taking me forever so a lot of content that was 'new' back then is now sort of irrelevant. Secondly, I am going to be self-publishing the magaizine though Apple's iBookstore.

It will be available for iPad, iPhone or iPod Touch as well as in a PDF format in case you aren't an Apple fanboy (or girl).

Very exciting times are coming for The inLIGHTin Workshop and I look forward to sharing them all with you.

Thanks for stopping by!
~Mike

2.02.2012

Site Migration Almost Complete

Hey folks,
I am almost finished with migrating over the inlightinworkshop.com site over to this one... I got a handful of posts to move over and then we should be all set!

Thanks for your patience!
Mike

1.13.2012

New Site for 2012

The inLIGHTin Workshop is making the move from WordPress over to Blogger. I am taking the next couple days to port everything over from one site to another. Half the WordPress image files were missing anyways so this will give me a chance to re-do some posts the right way and bring back all those images! I mean what good is a photography site without any working photos to show right?

So yeah just give me a couple weeks to move everything over and then we'll take things from there. 2012 is going to be an exciting time for The inLIGHTin Workshop. Keep on checking back for updates.

Thanks for all your support!
Michael

12.10.2010

Happy Holidays from the inLIGHTin Workshop

Hello everyone...

Just wanted to wish you all a safe and Happy Holiday season. Sorry for being lax in the articles lately. Life has been hectic the past month. We sold our house, we're building a new one so we are packing and moving everything into storage and all sorts of good stuff like that. Becky (the wife) only has a couple more weeks left in the pregnancy so it's likely that she will be born during this time of move to make things even more crazier over here. Then I am finishing up last minute wedding albums and fulfilling holiday orders for my 2010 photography clients.

But anyone who knows me knows that this is how I roll. If it isn't complete chaos then I had nothing to do with it ;)

I will keep you all posted with when workshops and new articles will be released.

Happy Holidays!
Mike

10.22.2010

Advanced Lighting with Speedlights

Want to start "making" photos instead of simply "taking" photos? One of the best ways to start is to incorporate some advanced lighting techniques with your flash (or flashes).

Shooting with available lighting is great and all and can really do the trick. As a matter of fact I made a career out of it for a couple years until I could afford some flashes myself.

STEP 1 - BABY STEPS:
You have to crawl before you can walk and definitely before you can run... The same goes for flash photography. It is a whole new ballgame that can really mess with your current understanding of ISO, Aperture and Shutter Speed and how they work with one another. With that in mind, start off with your flash mounted on your camera. Practice fill flash techniques and practice bounce flash techniques. The good news is that you should be able to start shooting in darker locations with better results. This is true even if you have inexpensive variable aperture "kit" lenses. Simply play around with TTL mode and work on riding your flashes' exposure compensation. Not enough flash? Increase the exposure compensation. Too much flash? Dial it down and try again. I would definitely suggest using manual mode for setting your ISO, Aperture and Shutter Speed... Using Aperture Priority, Shutter Priority or Program Mode will introduce other factors that can complicate things.

STEP 2 - HIGH SPEED SYNC (AKA Auto FP)
High speed sync is something that you may have to enable on your camera and/or flash unit. Refer to your manual on how to do this. Once enabled, you will notice that you can use shutter speeds faster than 1/200" or 1/250." This is high speed sync and it removes the limitations of having to otherwise being forced to use your camera's maximum sync speed or slower (refer to your manual for this value -- it's typically 1/200" or 1/250"). High speed sync is a life saver and is what allows you to dial down intense ambient light (like the sun) and also to be able to use wide open apertures. If you didn't have this capability then you would have to bring along a studio strobe, portable AC Power Pack and triggering device so you can shoot at like ISO 100, 1/250" at F/16. High speed sync is a lot cheaper and a lot more portable!

STEP 3 - OFF-CAMERA FLASH (MANUAL MODE)
Using your flash off-camera is a great way to learn lighting. In TTL mode, the camera does it all for you and the flash output will change from shot to shot. By switching your flash to manual mode, you are essentially treating it like a studio strobe and your flash will now only fire at the output you selected. This means your light will be consistent from shot to shot to shot. This setting is great for when things are not going to move (e.g. studio, portraits, etc...) Good luck if you are shooting sports (or a little kid on the move) this way. This is also where you can try incorporating a second (or third flash). The best part here is that you do not need the top of the line flashes, or even flashes from the same brand for that matter! You can get 3-4 cheap flashes for the price of one new model, brand name flash.
Just look for flashes that can shoot in manual mode. Bonus points if it also has a PC Sync port. Otherwise, you will have to purchase some additional items like special hot shoe mounts that have a pc sync port.


creative lighting with speedlights


You could still fire the flashes using the Nikon wireless but your flashes have to be in direct line of sight with one another in order for it to work. Consider using a PC sync cable, IR triggers or Radio triggers for added reliability.

STEP 4 - HIGH SPEED SYNC OFF-CAMERA
Take all the techniques mentioned above and roll them into one! Incorporate a couple different flashes and play around. Try setting the flashes to different exposure compensation values and experiment.

For some extra fun, throw on some light modifiers like a softbox, gel, gobo, snoot or honeycomb / grid for added effects.

Share your flash stories by commenting below.

Thanks for stopping by.
Michael

10.05.2010

Hildozine PocketWizard Caddy Review

I recently sold off most of my studio strobes in favor of using my speedlights. I have enough Nikon SB-900 speedlights to create a simple studio that is fast to set up and fast to tear down, which is great for on-location lighting.

If you have ever shot with me then you know how much I love high speed sync (Auto FP). In my opinion, this is where Nikon's speedlights and technology really excel over other camera manufacturers.

However, there are times when I want to simply shoot with my speedlights in manual mode because I want a consistent flash exposure from shot to shot. This is when I break out my trusty PocketWizard Plus II Transceiver units and hook them up to the pc sync input of my speedlights.

My only problem with this was figuring out how the heck to mount these things!

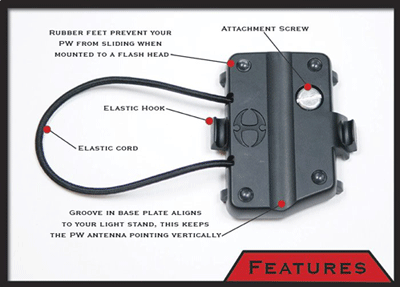
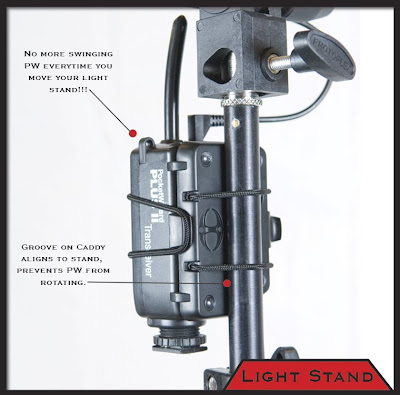
Now I use the term 'was' because I found a solution. Hildozine makes something called the PocketWizard Caddy and it securely mounts your PocketWizard to your lightstand or speedlight with ease. No messy velcro to mount on your expensive equipment and no sloppily hanging cables and devices. Plus they are only $15 each!


hildozine pocketwizard caddy review

hildozine pocketwizard caddy review

hildozine pocketwizard caddy review


The PocketWizard Caddy is essentially a plate with a elastic cord which mounts by screwing into the 1/4" thread on the PocketWizard.

The only hiccup with the design is that it covers the battery door. Granted PocketWizards seem to run forever on the same batteries, it does make for a little added hassle when you do need to replace them.

I can now mount my PocketWizard to either my speedlights or light stand with ease. No velcro all over my equipment and no mess of bungee cords and rubber bands. It is rugged and just works.

I have a total of three PocketWizards at this time and have myself two of these caddies and really love them. These are one of those products that is nice to have and is more of a convenience than anything. Hey, for $30 you can't go wrong...

Thanks for stopping by!
Mike

10.01.2010

Video Light For Photographers

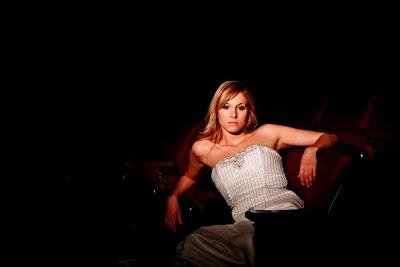
Video light rocks! It's a continuous light source which means that you can physically "see" what the light is doing. From there, all you have to do is set your exposure up just as you would if you were shooting in natural light. No need to worry about your sync speed or anything related to flash photography. It is just good, quick lighting.

video light used by a photographer to create a dramatic portrait of a bride in a movie theater.

This shot was taken at an old movie theater in downtown Albany, NY. I used my generic Smith-Victor video light to illuminate my subject and worked the barn doors of the light to prevent light falling too far off of her. The video light puts out a decent amount of light so my settings were 1/60 sec. at f/2.8 @ ISO 800.

Thanks for stopping by!
Mike

9.30.2010

Honl Photo Traveller8 Softbox Review

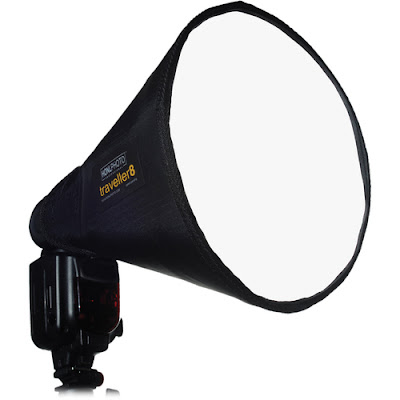
Honl Photographic was awesome enough to send me their Traveller8 Softbox for their speed strap system in preparation for my upcoming PPA Super Monday workshop on "Off-Camera Flash Techniques." I took it out for a spin and put it through its paces and am really, really, really happy with the results.

honl photo traveller8 softbox review

From HonlPhoto.com: "Create beautiful soft light from David's innovative new softbox design, with the quality and sturdiness you've come to expect from all Honl Photo Professional lighting products. Extremely easy to setup and attach to your shoe-mount flash unit using our popular Speed Strap (included). Folds flat to tuck into your camera bag, and weighs in at less than 4 ounces. Provides a pleasing circular catchlight in your subject's eyes. Fits most any shoe-mount flash by Nikon or Canon as well as larger units like the Vivitar 285."

The size of the softbox is roughly 11x9 inches folded and its look and feel is very rugged. It will definitely hold its own and I have confidence that it will not rip or tear even with me beating on it.

I photographed a senior portrait session over at a local park here and my setup was REAL simple. We're talking just my Nikon D700, Nikkor 70-200mm f/2.8 VR Lens, PocketWizard Plus II Transceivers, Nikon SB-900 Speedlight, Portable Light stand and the Honl Photo Traveller8 Softbox. I started shooting with a camera strap again which is nice because I can cart around my light stand with ease and throw my camera over my shoulder to free up my hands when working with my flash settings and whatnot.

Since I was using the PocketWizards, I had to shoot with my Nikon SB-900 speedlight in Manual mode. This also meant that I had to conform to my camera's maximum sync speed (1/250") and could not do any high-speed sync whatsoever.

I had to work the power of the flash, the distance between the flash and subject, ISO and Aperture to control the effect my flash had in the photo while my shutter speed simply controlled the amount of ambient light recorded. The Honl Traveller8 softbox is small enough to provide a tight light pattern on my subject and didn't really light anything that I didn't want it to. Since it is small, that also means that it won't get knocked over during windy days nearly as easy as my large 60" umbrella or 28" Westcott Apollo softbox. Due to the Traveller8's size and light pattern, I would really only use this for lighting a couple people. Any more and I would move to a larger light modifier like the 28" Apollo softbox or my 60" umbrella.

Here are some shots from the portrait session with the Traveller8 Softbox:


honl traveller8 softbox in action

sample images using honl traveller8 softbox

honl traveller8 softbox review

honl traveller8 softbox and the inLIGHTin Workshop />


The Honl Photo Traveller8 Softbox is $70 at B&H and comes packaged with a Speed Strap so that is an added bonus.

I would highly recommend this product for it's price, portability and usefulness for on-the-go lighting. I'd love to hear your thought on it if you own one too so comment below and share your experiences.

Thanks for stopping by!
Mike

9.25.2010

Thanks Honl Photographic

Honl Photographic was awesome enough to send over some great goodies for my upcoming PPA Super Monday Workshop all about Off-Camera Flash Techniques.

I think this means I will have to do some giveaways throughout the workshop.

This is really awesome of Honl Photographic to support the inLIGHTin Workshop like this so please check out their website at www.honlphoto.com and show some love.

Look at all the merch:

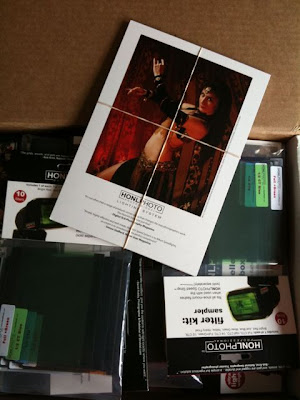
thanks to honl photographic for supporting the inlightin workshop


I hope to see you all on the 25th of October!
Mike

9.24.2010

Speedlights are awesome! They are portable and yet really robust as to what they offer. I guess that is why some of them run upwards to around $400+.

One of the features many have is the ability to zoom the flash head. Take my Nikon SB-900s for example, they can zoom from 12/17mm up to 200mm (on my DX/FX camera) which can give me a lot of variations of light. It is almost like a built-in snoot. Here's why: When the flash is mounted to the camera, it automatically zooms to match up with the lenses focal length and sends enough light to spread across the entire scene. Therefore, a wide-angle lens needs a lot of light spread out in order to light up everything properly. On the other hand, light needs to get thrown out, more like a "beam," when using a telephoto lens because it has to go further and cover less of the scene.

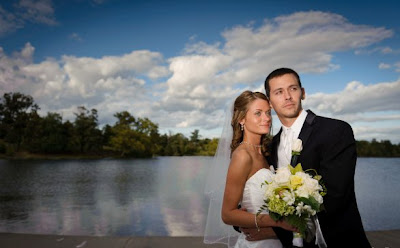
The beauty of this really comes into play when you are shooting off-camera with your flash. Take a look at the example image below:


This picture was taken at a recent wedding. I used high-speed sync to darken the background and used my flash off camera to illuminate both the bride and groom. I set the speedlight to zoom all the way up to 200mm so that it would shoot a beam of light directly on the couple's faces and fall off fairly quick. This flash was held as far out as I could in my left hand as I held my camera with my right. I used my Nikon D700's pop up flash as Commander mode only to trigger the off-camera flash for me. I believe the flash was set to +1.3ev as well. My 24-70mm lens was used here because that wide angle allows me to get in close so the flash can be close enough to hit my subjects (inverse square law 101).

Moral of the story, you don't always have time to set up and light a scene the way you want to when it comes to weddings. You have to prepare and pre-plan for these things and roll with the punches. No light stand, no softbox, no assistants holding reflectors. Just me and my flash.

Thanks for stopping by!
Mike

9.21.2010

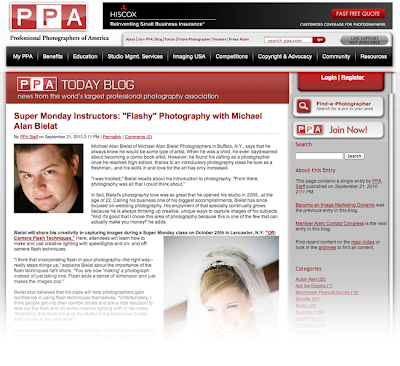
Featured on PPA.com

The Professional Photographers of America (PPA) is the world’s largest nonprofit association for professional photographers, with more than 20,000 members in 54 countries. This association seeks to increase its members’ business savvy as well as broaden their creative scope, advancing careers by providing all the tools for success...as they have since 1880.

I am hosting a Super Monday Workshop for the PPA and they have chosen to feature me on their website:

Click here to read the entire article: http://www.ppa.com/ppa-today-blog/super-monday/super-monday-instructors-flash.php


Super excited about this one!
Enjoy.
Michael

9.17.2010

Available Lighting

Available lighting is something that I think a lot of photographers take for granted and I am guilty of this as well...

As photographers, we buy all these cool gadgets, gizmos, light modifiers and whatever else and totally over-complicate our setup.

More stuff = more problems.

This is one of the big reasons why I am downsizing all my gear for 2011. I used to think that golf had a ton of wacky gizmos but now I am thinking that photographers have them beat!

One of the things that is available to us, free of charge, is available light:


I have always tried to not book multiple outdoor portrait sessions in one single day. If you do then rock on! I prefer to shoot when the light is under that "golden hour" when the sun is setting and the light becomes softer and more easy to work with. My client gets that full hour of my time then and that light is theirs and theirs alone.

If you have ever tried doing a photo shoot under high noon sun without any overcast or shade (or worse, in a park with trees) and you will know what I am talking about! It takes A LOT more work to even out that light that you simply don't have to put yourself through. Sure you could cart along studio strobes, large diffusion tents, a staff of 12 assistants to shield the light but why bother if you don't have to??? Good luck if you are photographing children... Try moving at their speed with all that equipment!

When I was starting out I had a Nikon D100 D-SLR, two entry level lenses (variable aperture of like f/3.5 to f/5.6) and one speedlight (Nikon SB-800). I didn't have millions of things to work with yet I still got the job done. I did this by being prepared and booking my portrait sessions at logical times when the light was right.

guess what? YOU CAN TOO!

Just put your subject in a shady area or use window light to your advantage for amazing results. If your shooting outdoors, add a little fill flash (-1 ev to start) to create a catch light in the eyes for good measure.

Book some portrait jobs, build the portfolio (blog or website), book more jobs from the portfolio and keep racking in the $$$. With money you can start to upgrade your equipment. You will know what you NEED (not WANT) simply through remembering the struggles that you encounter when doing your portrait assignments. It is a slow process but a worthwhile one since debt sucks!

Available lighting... Use it!

Thanks for stopping by!
Michael

Honl Speed System Review

Honl Photo http://www.honlphoto.com has some really cool light modifiers that I have been using for quite some time now. The Speed Strap system is for flashes / speedlights only. They are portable, rugged and really fun to play with.

honl speed system light modifier review


Honl's Speed Strap system also has other accessories like color correction filter kits, color effect filter kits, gobos and a really cool 11x9" Traveler8 round softbox ($70) that I am drooling over.

The closest thing I have to the softbox is the Westcott Apollo 28" softbox but man does that guy take up some space even when it isn't folded up. Additionally, you need the flash to be off-camera AND mounted to an umbrella adapter and light stand for it all... Not my idea of "portable."

honl speed system light modifier review


honl speed system traveller8 soft box review


There isn't much to say about these things except for that they are REALLY great. The speed strap is essentially one long thin-ish Velcro strap (soft side on outside, rough side on inside) that you wrap around your flash head.

Easy to put on, easy to take off.


From there, you use the speed strap to mount the various light modifiers that I mentioned above.

honl speed system light modifier review


Yes, the speed strap itself is essentially an overpriced Velcro strap but it looks good, holds up well and can be used for so much more than just the Honl stuff.

For example, it can stay mounted on your speedlight and hold your RadioPopper PX transmitter unit in lieu of having to physically mount a strip of velcro to your flash head. You can also hook up a PocketWizard to some velcro and strap it on the Honl and run a PC sync to PC sync cable on your camera (that is IF you have a PC sync input like on the Nikon D700) and fire BOTH your speedlight AND a studio strobe at the same time... Crazy lighting possibilities all with the help of Velcro. So yeah that Speed Strap is well worth the extra couple bucks then having to ghetto rig one yourself.

If you own an entry level flash such as the Nikon SB-400, Nikon SB-600, Canon 430EX, etc which doesn't have a bounce card then you can still save a ton of money and get the Honl speed strap and bounce card for around a hundred less then having to upgrade to a better flash unit... Great way to keep your equipment and get the most out of it. I was going to do a post on making one yourself using some foam paper found at a craft store but screw it, get a Honl and it will do wonders (and won't look like an art school project from hell)

Two big thumbs up for the Honl Speed System. Highly recommended. Check out Honl Photo's website at: www.honlphoto.com

PS, I will be rocking out the Honl Speed System at my PPA sponsored Super Monday workshop that deals with "Off Camera Flash Techniques." Come on by and try them out for yourself.

Thanks for stopping by!
Michael

9.15.2010

Host A Photography Workshop In Your City

I am making a vow to make 2011 the year of inLIGHTment!

Hosting a workshop is a great way (FREE) way to get an amazing photographic eduction that is in your neck of the woods. To host an inLIGHTin Workshop, all you have to do is pick a location (such as a home or photography studio) and get people to attend. You are rewarded for your hard work by receiving a FREE Workshop Ticket (a $350+ value) and some great goodies from the inLIGHTin Workshop and sponsors.

If you are interested in having The inLIGHTin Workshop come to your hometown and do a photography workshop then all you have to do is email me at: inlightinworkshop(at)gmail(dot)com and we can get the ball rolling.

I will reply back ASAP to answer any questions and to make all the necessary arrangements.

Thanks for your support. I look forward to taking a trip to your neck of the woods in 2011!
Michael

9.09.2010

Online Photography Workshops

I did some final testing last night and things are ready to roll.

I am now offering Online inLIGHTin Workshops so you can improve your photography right from the comfort of your own home (and on your time). I have a lot of readers from across the globe and this allows for you all to experience the same learning that all the locals are bragging about.

These online workshops are are done using Skype because it is free software for Windows and Macs and allows us to not only video chat but share our screens as well (which is great for post-processing and workflow lessons).

photography workshops online with Skype

I will be offering these Online One-On-One inLIGHTin Photography Workshops for a price of $50 per hour for a limited time only. Workshop topics can consist of anything of your choosing (photography 101, lighting techniques, posing, post processing, workflow, business, etc...).

Contact me at inlightinworkshop (at) gmail (dot) com if you have any questions and to schedule a workshop. Payment is due beforehand and is non-refundable.

Keep on shooting!
Mike