Want to start "making" photos instead of simply "taking" photos? One of the best ways to start is to incorporate some advanced lighting techniques with your flash (or flashes).
Shooting with available lighting is great and all and can really do the trick. As a matter of fact I made a career out of it for a couple years until I could afford some flashes myself.
STEP 1 - BABY STEPS:
You have to crawl before you can walk and definitely before you can run... The same goes for flash photography. It is a whole new ballgame that can really mess with your current understanding of ISO, Aperture and Shutter Speed and how they work with one another. With that in mind, start off with your flash mounted on your camera. Practice fill flash techniques and practice bounce flash techniques. The good news is that you should be able to start shooting in darker locations with better results. This is true even if you have inexpensive variable aperture "kit" lenses. Simply play around with TTL mode and work on riding your flashes' exposure compensation. Not enough flash? Increase the exposure compensation. Too much flash? Dial it down and try again. I would definitely suggest using manual mode for setting your ISO, Aperture and Shutter Speed... Using Aperture Priority, Shutter Priority or Program Mode will introduce other factors that can complicate things.
STEP 2 - HIGH SPEED SYNC (AKA Auto FP)
High speed sync is something that you may have to enable on your camera and/or flash unit. Refer to your manual on how to do this. Once enabled, you will notice that you can use shutter speeds faster than 1/200" or 1/250." This is high speed sync and it removes the limitations of having to otherwise being forced to use your camera's maximum sync speed or slower (refer to your manual for this value -- it's typically 1/200" or 1/250"). High speed sync is a life saver and is what allows you to dial down intense ambient light (like the sun) and also to be able to use wide open apertures. If you didn't have this capability then you would have to bring along a studio strobe, portable AC Power Pack and triggering device so you can shoot at like ISO 100, 1/250" at F/16. High speed sync is a lot cheaper and a lot more portable!
STEP 3 - OFF-CAMERA FLASH (MANUAL MODE)
Using your flash off-camera is a great way to learn lighting. In TTL mode, the camera does it all for you and the flash output will change from shot to shot. By switching your flash to manual mode, you are essentially treating it like a studio strobe and your flash will now only fire at the output you selected. This means your light will be consistent from shot to shot to shot. This setting is great for when things are not going to move (e.g. studio, portraits, etc...) Good luck if you are shooting sports (or a little kid on the move) this way. This is also where you can try incorporating a second (or third flash). The best part here is that you do not need the top of the line flashes, or even flashes from the same brand for that matter! You can get 3-4 cheap flashes for the price of one new model, brand name flash.
Just look for flashes that can shoot in manual mode. Bonus points if it also has a PC Sync port. Otherwise, you will have to purchase some additional items like special hot shoe mounts that have a pc sync port.
You could still fire the flashes using the Nikon wireless but your flashes have to be in direct line of sight with one another in order for it to work. Consider using a PC sync cable, IR triggers or Radio triggers for added reliability.
STEP 4 - HIGH SPEED SYNC OFF-CAMERA
Take all the techniques mentioned above and roll them into one! Incorporate a couple different flashes and play around. Try setting the flashes to different exposure compensation values and experiment.
For some extra fun, throw on some light modifiers like a softbox, gel, gobo, snoot or honeycomb / grid for added effects.
Share your flash stories by commenting below.
Thanks for stopping by.
Michael
9.24.2010
Speedlights are awesome! They are portable and yet really robust as to what they offer. I guess that is why some of them run upwards to around $400+.
One of the features many have is the ability to zoom the flash head. Take my Nikon SB-900s for example, they can zoom from 12/17mm up to 200mm (on my DX/FX camera) which can give me a lot of variations of light. It is almost like a built-in snoot. Here's why: When the flash is mounted to the camera, it automatically zooms to match up with the lenses focal length and sends enough light to spread across the entire scene. Therefore, a wide-angle lens needs a lot of light spread out in order to light up everything properly. On the other hand, light needs to get thrown out, more like a "beam," when using a telephoto lens because it has to go further and cover less of the scene.
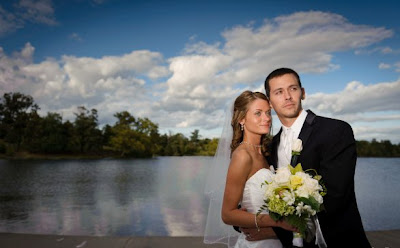
The beauty of this really comes into play when you are shooting off-camera with your flash. Take a look at the example image below:
This picture was taken at a recent wedding. I used high-speed sync to darken the background and used my flash off camera to illuminate both the bride and groom. I set the speedlight to zoom all the way up to 200mm so that it would shoot a beam of light directly on the couple's faces and fall off fairly quick. This flash was held as far out as I could in my left hand as I held my camera with my right. I used my Nikon D700's pop up flash as Commander mode only to trigger the off-camera flash for me. I believe the flash was set to +1.3ev as well. My 24-70mm lens was used here because that wide angle allows me to get in close so the flash can be close enough to hit my subjects (inverse square law 101).
Moral of the story, you don't always have time to set up and light a scene the way you want to when it comes to weddings. You have to prepare and pre-plan for these things and roll with the punches. No light stand, no softbox, no assistants holding reflectors. Just me and my flash.
I have been really minimizing my equipment over the past couple months and following the KISS (keep it simple stupid) approach to my photography. I thought golf was bad but I really think that photography has more gear and gadgets than anything else.
I used to bring out the big artillery for my wedding and portrait assignments and a lot of it wasn't needed. Sure a studio strobe and AC power pack is nice to have... But my speedlights and high speed sync techniques can also do the trick. Throw in some nice light modifiers such as a soft box or shoot through umbrella and I'm in business.
So here is my list of what I found to be essential equipment for off camera flash photography:
I did add the prices to show you how much each item goes for. As you can see, it can get expensive!
Want to save a bit of money? If you shoot Nikon then you can do without a second SB-900 speedlight if your Digital SLR has a pop up flash and is fairly current. You can use the pop up flash to act in Commander mode only and trigger your one SB-900 that way. This will also allow you to get away from needing those two PocketWizards. Let's tally that up for a savings in the ballpark of $797.95! The only con here is that you are going to be limited by the flashes and they need to have a direct line of sight. BUT you get to use high speed sync which is an amazing thing if you get the hang of it!
I get a lot of questions where people ask me what flash I recommend for them. Now I am a Nikon shooter so I will be using their speedlight models while getting my point across to you all.
The most popular choices for Nikon shooters are the SB-600 and the SB-800 / SB-900 models. If you are a Canon shooter then many or all of these bells and whistles also differ between Canon's 430EX and 580EX speedlights.
First, let's address the most important thing... PRICE. The SB-600 is around $200 while the latest SB-900 comes in at around $450 and up. So far so good?
Next, the SB-600 is much smaller in both size and weight (10.6 oz. to be exact). That can be nice especially if you do not have a battery grip attached to your camera or if you have a more compact D-SLR (a la the D40, D90, etc..). The SB-900 weights in at just under a pound (14.6 oz.) and it is big! It is more solid and rugged and the hot shoe is more robust.
Now for what's under the hood. The SB-600 does have less power but not enough to be a deal breaker. Flash power is rated in what's called a guide number. The SB-600 rates in at 98 while the SB-900 rates in at 111.5 at ISO 100.
Since the SB-600 outputs less power, you get more shots with your AA batteries than with the SB-900. It is almost a 2 to 1 difference so it is pretty considerable!
The SB-600 is an older model so it supports both new and old TTL modes (i.e. i-TTL, D-TTL and Auto TTL) while the SB-900 supports only i-TTL. No biggie here unless you have an older camera model like the D100.
So far the SB-600 seems to be kicking some butt right? Now for where the SB-900 excels.
First, the lens coverage is pretty substantial. You can zoom your SB-900 all the way up to 200mm and that means you have yourself a nice range to do some creative lighting. I know that I have used the 200mm zoom to get more reach or to give the effect of having a snoot attached. To contrast, the SB-600 can only zoom to 85mm. This isn't a big deal if you don't use flashes for creative lighting or off camera flash too much.
Next, the SB-900 has the ability for the flash head to turn a complete 180 degrees left and right where the SB-600 can rotate 180 to the left but only 90 degrees to the right. This can be a pain for you bounce flash shooters like me.
You also cannot hook up an external battery pack to the SB-600 while you can use the SB-8 or 9 battery pack for more oomph and faster recycling.
In wireless TTL mode, the SB-600 can only act as a remote / slave while the SB-900 can also be a master / commander flash. If you use manual mode then you can go all the way down to 1/128 power with the SB-900 while the SB-600 only goes down to 1/64 power.
Other features that are pretty nice on the SB-900 is the ability for it to receive firmware updates, has overheat protection (which you should immediately disable), adjustable light patterns and gel filter identification.
Nikon is also nice enough to include a diffusion dome, gel filters and a built-in bounce card with the SB-900.
So what is my suggestion??? Eventually get both!
Start with the SB-600 and then keep it and get the SB-900 when you get more into advanced flash techniques. Now this suggestion goes for anyone who shoots a camera other than a flagship model like the D3s. All other models have a built in flash and many of which allow for it to act as a commander flash. D3s users do not have that built-in flash so the SB-900 is really needed simply for that commander mode feature.
I can still remember my first run-in with flash photography... It was 2002 and I just picked up my first set of studio strobes. A good friend of mine gave me a crash course in how to use them and light modifiers and whatnot and then I threw myself to the wolves and booked my first sports portraits. It was for a karate school that I taught at and I basically took those in and out portraits of the little kids for mom and dad to get a bunch of wallets of them and send off to their relatives.
Granted, I wasn't doing any Rembrandt or butterfly lighting here... It was more like lighting for a Passport photo than anything.
Long story short, I was hooked! I ran out and picked up an SB-800 speedlight the day it came out (which was in mid-2003 I believe) That was when I had my trusty Nikon D100 with me. Man I loved that camera... I might even pick another one up just because I miss it so much. Tangent. Sorry about that. So back to the lesson... Nikon has an amazing CLS system. Even back then! Their D-TTL stuff was magical and it caused me to work my butt off freelancing so I could pick up a second one! The CLS system came even further down the road and they introduced more bells and whistles which is what you see today.
With two, I was able to do all sorts of awesome flash photography. I could essentially, take my studio on-location with portability and easy set-up/take-down to get my job done better and faster... Cool.
So, I worked on it and studied lighting more and just kept experimenting. The internet was a huge help along with various DVDs and seminars that I attended. I definitely encourage learning so soak up as much information as you can so you can be all that you can be.
On that note, I hope that these next couple flash articles will help you and get you to use your flash off the camera more.
My workshops and seminars cover all the basics so for this article, I am just going to assume that you at least know the fundamentals, camera settings and lingo that I will use.
First things first, you need to think about what you are going to use as your flash settings. The two obvious choices that I can think of is whether you will want to use the camera and flash's TTL system or if you simply want to use the flash in manual mode. There are pros and cons to using either one so let's go over what they are:
TTL FLASH: (TTL stands for "Thru The Lens" BTW)High speed sync (or FP sync for Canon shooters)... This is some awesome stuff that is worth it's weight in gold! (More that high speed sync stuff later) TTL is also very easy to use. Nikon shooters do have a little more luxury in this department and have the ability to easily tweak their flash output on all slave units from their camera. Canon users don't have such a luxury and have to purchase a ST-E2 and use light ratios to get the same effect. TTL frees us up from the old days where it seemed like every photographer also needed a quantum mechanics degree as well...
Seriously with that? Well the TTL system takes care of that and calculates the proper flash output because it knows all the variables in those equations. The result it that you have your own little math geek in your flash now!
The technology does have its limitations however. For example, you will get flaky and inconsistent results if the ambient light is too bright or when commander unit is not in sight of the slave units and stuff like that. Distance from commander to slave can also be an issue. There are products out there like the RadioPoppers and PocketWizards newest product (The TT1 and TT5) that do fix these limitations. Another issue is that this stuff is proprietary so you can only have Nikon flashes with your Nikon cameras or Canon flashes with your Canon cameras... You can see that this can get expensive at $300+ a pop for their latest flashes.
Check out this video on the Mini TT1 and Flex TT5...
MANUAL MODE: Good ol' fashioned manual mode. A lot of photographers use manual mode and I do too. However, photographers such David Hobby and Zack Arias are 110% manual mode flash... Why do that if TTL is as awesome as I say it is??? Well first off, price... The only real big purchase you would make is for at least a pair of PocketWizard's or more if you want to use more flashes. There are things known as "eBay triggers" out there which may not be the industry standard, but are 50 times cheaper than a pair of $400 PWs. Not bad! You could even get away with a long PC Sync cable and run it from your camera to your flash tethered to save some cash... Also, you aren't limited to your specific camera brand's flashes. You can pick up ANY flash that has a PC Sync input and hook it up to your wireless transmitter and you are good to go! If the flash doesn't have a PC Sync input then you can always buy a hot shoe mount that has one and daisy chain it that way to work. (PC sync cable to hot shoe mount then flash mounted on hot shoe)
So you can get away with dropping a lot less for a manual flash setup... Why else does it rock? Well, TTL does all that fancy pants trigonometry stuff to do all the busy work for you with each and every shot. That means the flash output will be or can be different with each shot or composition change that you make. This could be an issue and give you inconsistent results from one to another... It's sort of the Matrix metering system but for flashes you know? Therefore you have to ride the flash exposure compensation.
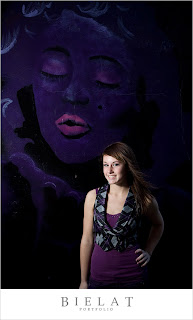
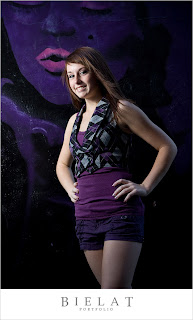
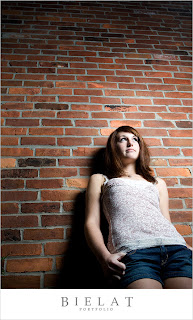
Here are a couple example images that were shot with Manual Flash:
We were in a tight space in this alley and I couldn't rely on my lighting system to work in TTL mode. Also, it was dark enough where I didn't need a fast shutter speed to dial down the ambient light so I hooked up my PocketWizard Plus II receivers and shot in manual mode. All I needed to do was set my flashes up once and I could spend more time shooting and less time fidgeting with my settings.
With manual flash however, you set it and forget it... Position subject at X put light stand and flash about arms length away from them at Y, dial in your settings and every shot will have the same flash output... DONE! Unfortunately, there are bad things about this setup. The most annoying issue is your camera's stupid sync speed. The way SLRs work is that the mirror flaps up and the shutter opens for x seconds and closes and then the mirror flaps down... Many cameras have a standard sync speed of 1/200", 1/250" or even a 1/500" (like on the Nikon D70s) but check your camera manual to see what yours is... It is the maximum shutter speed that you can use when shooting with a flash. Plain and simple. If you shoot at that shutter speed or slower then you are all set... Shoot faster than the sync speed and welcome to 'blacklinesinmyphotosville'. What that nice long line is at the bottom of your picture (or left or right side if shooting portrait) is that your exposure was so fast that it didn't give the image enough time to get the full effect of the flash because it closed up too quick.
All in all, as mentioned before, I use both methods. There is a time and place for both of them. I use TTL and high speed sync when I want to shoot portraits and want overpower the sun... That means I can dial down the ambient light and get really cool portraits that are just top notch... If I were to do that in manual mode then I would need a lot more flash power (enter studio strobes and power packs which cost $$$$) to get my shutter speed slow enough so that it falls into the sync speed of the camera....
So that gives you the rundown on what your options are as far as flash modes are concerned. The next part will discuss how to go about quickly set your gear up and dialing in your settings so you can spend more time shooting and less time fidgeting with your it all. Not a bad deal right?
*Sample images coming soon
Be sure to comment on this post and let me know how you use your flash. I know there is a lot more information on the subject. This is meant to be a nice general overview of things to get people started.