I cannot for the life of me think of why I haven't done light painting before. I believe the first time I actually tried it was when I was in Joshua Tree National Park doing some star trails. The foreground needed some light so I used a flash light to expose them.
Fast forward to 2012 and I brought it back to the table for some of my wedding clients.
The camera settings are open to interpretation based on where you are. I played with my ISO between 200-400.
My aperture was around f/8 and my shutter speed was very slow, around 10-15 seconds until I had something worth while.
The main concept for properly exposing the shot is:
You need stop down the aperture and low ISO so that the light you paint with just tickles the subject. If you are wide open then one hit of the flash will flood your shot.
You use your speedlight in manual mode off camera and do a "test fire" so the flash hits your subject. Do this to taste.One hit may be all you need while other times you may need. Other times, you can pop a couple behind your subject. f-stops around f/8 and f/16 start to show this awesome starburst effect with light that can be really cool.
The shutter speed needs to be slow so that you can run around and paint with a continuous light source. In my case, I had my iPhone and some flashlight app that changed my screen color. What you see ghosted in the background is just the light emitting from my iPhone as I ran around my bride and groom. The exposure was so long that I didn't get picked up however. Be creative, you can use whatever continuous light source you want. Even rope lights and kid toys.
Always be moving when running through the frame. If you are slow or your flash hits you then you will
show up in the shot. Otherwise, with such a long shutter speed you
shouldn't even show up.
You need to have your camera on a tripod. I set my camera to a 5 second timer so I can get prepared to run around like a crazed lunatic.
Your subject HAS to be standing still. If they move, that slow shutter speed will surely pick it up and then you have to re-do the shot. Try to shoot while it's warm out because even cold shivers can get picked up.
TRY AND PRACTICE BEFORE YOU TAKE IT TO A SHOOT. No client feels comfortable when you are fiddling with gear and not able to make the shot after you hyped it up.
That should be all. Thanks for your support.
Comment if you have any questions.
~ Michael
Just a quick FYI for you Nikon shooters out there. In case you didn't know already, Nikon does something really cool (yet can bite you in the you know what) when you are shooting in Av, Tv or P modes.
Cameras are getting smarter, but they are still stupid. The technology now is better than ever yet the cameras still can (and do) get fooled.
When you set your camera up to shoot in Aperture Priority (Av), Shutter Priority (Tv) or Program (P) mode, all that the camera does is set your Shutter and/or Aperture values for 18% gray. Awesome if you are shooting concrete, crummy if you are shooting a bride.
We therefore have to "enlighten" the camera and tell it that what it 'thinks' it knows is wrong and override the settings. This is done via the Exposure Compensation button. Set it to some plus or minus value and the camera will then over/under expose each shot by however many stops you choose...
But how does that work if you have a flash mounted to your camera?
Nikon has the best flash technology that I have seen par none and they thought long and hard about this and came up with the following:
Nikon takes the flash exposure compensation that the speedlight is set to AND THEN factors in what the camera's exposure compensation is. What this means is that if your flash is set to -1 ev (exposure value) while your camera is set to +1 ev then your flash will actually be outputting 0 ev.
If your camera is set to -.3ev and your flash is set to -.7 ev then your flash will actually operate at -1 ev...
If you are studious enough then you may be asking yourself "...but what happens when we switch our camera over to Manual mode?"
Great question and I'm glad you asked that...
When you switch over to Manual mode, the flash exposure compensation will still honor the -.3ev or -.7ev or whatever your exposure compensation (along with flash exposure compensation) is set to.
So make sure your camera's exposure compensation is set to 0ev when you want to make sure that it isn't going to affect anything.
I am by no means am I the most perfect amazing lighting master guru guy.
However, the one thing about me is that I am always trying to learn and re-learn stuff. For example, I was just recently taking a look at Nikon's micro-site all about their Creative Lighting System (CLS) and wanted to brush up on my TTL knowledge.
One thing jarred my memory and reminded me of something that I meant to write about for a while now-- the i-TTL BL setting. See way back in the early days of Nikon's TTL flash technology that I can remember (circa 2002), the BL in i-TTL stood for Back-Lit. Today, Nikon re-branded it by now referring i-TTL-BL as meaning BaLanced Fill-Flash!
Here is the definition from Nikon: "Nikon's i-TTL (intelligent through-the-lens) Balanced Fill-Flash automatically balances the output of the Nikon Speedlight and the scene's ambient light.
Immediately before the main flash goes off, the Speedlight fires a series of monitor pre-flashes, which convey Information about the scene's lighting to the camera. Combined with information from the camera's 3D Color Matrix metering system, the information is analyzed to adjust flash output to balance the scene's ambient light.
All of this complex processing happens in a fraction of a second, before each exposure, to provide unprecedented levels of flash precision and performance."
I always have my flash set to i-TTL BL with my SB-900s. Why? Because I want my lighting to be balanced with the ambient light... I found that Nikon's technology does an amazing job at "knowing" what is going on in front of it and compensating appropriately. Granted, it is just 1s and 0s and it can be fooled but so can anything else with camera technology. It is important to think in advance and realize how much light you need (and want) in your image. For example, do you want a little catch light in the eyes? Maybe a little fill flash to fill in some wrinkles or harsh shadows or maybe you want to do some dramatic lighting like the pic below:
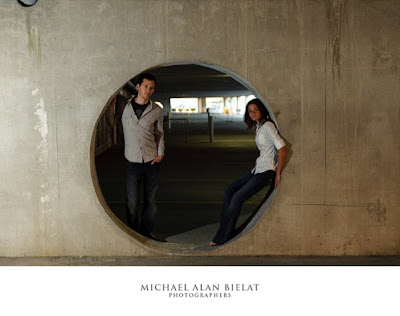
Image shot using the Nikon D700. Off Camera Flash (camera left) set to i-TTL -2ev to resemble a car headlight in this parking garage.
Attention Canon shooters: It's important to note that Canon's e-TTL II behaves in a similar way to Nikon speedlights. That's good news for you Canon flash guys.
So this post is more about something to watch out for.
I have a couple D700s and have had the same problem on each of my bodies with a couple Nikon SB-900 Speedlights. What ends up happening is that the speedlight flickers and misfires when any sort of movement happens. I must have gotten flashed a hundred times last week.
The D700 is an amazing camera and its low light capabilities is just stellar. However, I still use flashes A LOT and it is a real bummer that this camera can't keep up with a heavier flash.
For the time being, I took a hammer to the hot shoe, very gently, and tapped the hot shoe flaps so they fit the speedlight tighter. I also used needle nose pliers to gently pry the metal things inside the hot shoe as well to make for a tighter fit. There is a $30 Nikon WG-AS3 Flash Water Guard which I used more to keep the flash tighter to the camera ever since this happened the first time. Unfortunately, I lost mine . A new one is on the way and hopefully that can help to further keep the D700 in working order without needing to be sent to Nikon.
Anyone else have (or had) similar problems? Comment below and share your stories.
I have a D700 with the SB800. I know how to adjust the settings to get the right flash output after I've seen in my histogram, but in a wedding a lot of times the moment is gone and you can't take a second shot.
Please give advice on how to think through the settings? How far are your subjects when you use 1/4, 1/8 power, etc? Do you constantly change your flash or do you change your distance from the subject? Bride walking aisle?
Thank You!"
Thanks for writing. I too use the Nikon D700 and have myself the Nikon SB-800 and SB-900 speedlights. The one thing that stood out to me in your question was that you were mentioning stuff like 1/4 and 1/8 power. That is leading me to believe that you have your flash set to Manual mode and not TTL (Through The Lens). Manual mode was handled a certain way back in the film days. Guide numbers, distance to subject, blah blah blah. Technology has really advanced and TTL takes away "almost" all those complicated trig functions and stuff that film photographers had to do before. I do have an article about TTL Flash work that is worth looking at for a little more background on what it does. I moved to different hosting providers so some of the images in the article are MIA for the time being. I will get those back up as soon as possible because nothing beats visual examples of all this complicated terminology. Note, this article is in regards to the flash in TTL mode and OFF CAMERA and on a light stand. Not too many differences but just be aware that things are different than on-camera flash.
So to answer your question, I don't really think at all. You can too. Just set your flash to TTL mode and give that a whirl. End of story. What happens in TTL mode is that a pre-flash is fired just before the actual flash does. This pre-flash illuminates your subject and that information is recorded by the camera. The camera takes that, plus the focal length of your lens plus your current camera settings (shutter speed, aperture and ISO) and comes up with the proper "median" flash power that will correctly light your subject. Take a look at the image and if it is slightly too dark or too light then that is where the Flash Exposure Compensation comes in handy. Dial that up or down to tell your flash "Hey, whatever you are thinking, increase or decrease it some" and it will listen and do just that. Flashes are very obedient like that.
This is a simple tip on how you can achieve a better (and more accurate) colors with your images. Mind you, this is for when you are shooting with a speedlight (whether on or off camera) like the Nikon SB-900 or Canon 580EX II or even with studio strobes.
Let's take this down to the most basic situation where you will be using a flash to help convey my message.
So you are shooting a wedding in a normal sized room that is light with incandescent bulbs. These bulbs are giving off a warm, amber color. If we were shooting without a flash then our in-camera white balance should be set to incandescent or a custom Kelvin temp of something like 3200K or something within that range. That is all fine and dandy so shoot away.
But what happens if the room is dimly lit and you need a flash to help light things up? Flashes are daylight balanced around 5400K so what will happen is that the light from the flash will conflict with the ambient light from the incandescent bulbs and you will get various color casts on your subjects or background. Welcome to Photoshop hell at that point!
All we need to do is gel our flashes with the proper CTO filter so we can essentially modify the daylight balanced speedlight and mold it into becoming about the same Kelvin temperature of the ambient light that is around. In the situation above, an amber filter over the speedlight would bring that 5400K speedlight down to the 3200K range. DON'T FORGET TO SET YOUR WHITE BALANCE TO INCANDESCENT AND NOT FLASH!
If your white balance is still off then that is okay because you are at least in the same realm of light without worries of any serious color cast that would be noticeable. This is a very easy fix if you shoot in RAW.
Nikon's SB-900 comes with a couple gels to correct for different lighting conditions. These gels even have some intelligence to them and allows the flash to know which one is mounted. If you are shooting in Auto white balance mode then the flash can tell the camera what filter is over the flash so the camera can take the necessary actions for providing you with a fairly accurate image and color rendition. They even include a real spiffy gel filter holder that snaps on to the flash.
So what is the lesson we learned today boys and girls???
I can still remember my first run-in with flash photography... It was 2002 and I just picked up my first set of studio strobes. A good friend of mine gave me a crash course in how to use them and light modifiers and whatnot and then I threw myself to the wolves and booked my first sports portraits. It was for a karate school that I taught at and I basically took those in and out portraits of the little kids for mom and dad to get a bunch of wallets of them and send off to their relatives.
Granted, I wasn't doing any Rembrandt or butterfly lighting here... It was more like lighting for a Passport photo than anything.
Long story short, I was hooked! I ran out and picked up an SB-800 speedlight the day it came out (which was in mid-2003 I believe) That was when I had my trusty Nikon D100 with me. Man I loved that camera... I might even pick another one up just because I miss it so much. Tangent. Sorry about that. So back to the lesson... Nikon has an amazing CLS system. Even back then! Their D-TTL stuff was magical and it caused me to work my butt off freelancing so I could pick up a second one! The CLS system came even further down the road and they introduced more bells and whistles which is what you see today.
With two, I was able to do all sorts of awesome flash photography. I could essentially, take my studio on-location with portability and easy set-up/take-down to get my job done better and faster... Cool.
So, I worked on it and studied lighting more and just kept experimenting. The internet was a huge help along with various DVDs and seminars that I attended. I definitely encourage learning so soak up as much information as you can so you can be all that you can be.
On that note, I hope that these next couple flash articles will help you and get you to use your flash off the camera more.
My workshops and seminars cover all the basics so for this article, I am just going to assume that you at least know the fundamentals, camera settings and lingo that I will use.
First things first, you need to think about what you are going to use as your flash settings. The two obvious choices that I can think of is whether you will want to use the camera and flash's TTL system or if you simply want to use the flash in manual mode. There are pros and cons to using either one so let's go over what they are:
TTL FLASH: (TTL stands for "Thru The Lens" BTW)High speed sync (or FP sync for Canon shooters)... This is some awesome stuff that is worth it's weight in gold! (More that high speed sync stuff later) TTL is also very easy to use. Nikon shooters do have a little more luxury in this department and have the ability to easily tweak their flash output on all slave units from their camera. Canon users don't have such a luxury and have to purchase a ST-E2 and use light ratios to get the same effect. TTL frees us up from the old days where it seemed like every photographer also needed a quantum mechanics degree as well...
Seriously with that? Well the TTL system takes care of that and calculates the proper flash output because it knows all the variables in those equations. The result it that you have your own little math geek in your flash now!
The technology does have its limitations however. For example, you will get flaky and inconsistent results if the ambient light is too bright or when commander unit is not in sight of the slave units and stuff like that. Distance from commander to slave can also be an issue. There are products out there like the RadioPoppers and PocketWizards newest product (The TT1 and TT5) that do fix these limitations. Another issue is that this stuff is proprietary so you can only have Nikon flashes with your Nikon cameras or Canon flashes with your Canon cameras... You can see that this can get expensive at $300+ a pop for their latest flashes.
Check out this video on the Mini TT1 and Flex TT5...
MANUAL MODE: Good ol' fashioned manual mode. A lot of photographers use manual mode and I do too. However, photographers such David Hobby and Zack Arias are 110% manual mode flash... Why do that if TTL is as awesome as I say it is??? Well first off, price... The only real big purchase you would make is for at least a pair of PocketWizard's or more if you want to use more flashes. There are things known as "eBay triggers" out there which may not be the industry standard, but are 50 times cheaper than a pair of $400 PWs. Not bad! You could even get away with a long PC Sync cable and run it from your camera to your flash tethered to save some cash... Also, you aren't limited to your specific camera brand's flashes. You can pick up ANY flash that has a PC Sync input and hook it up to your wireless transmitter and you are good to go! If the flash doesn't have a PC Sync input then you can always buy a hot shoe mount that has one and daisy chain it that way to work. (PC sync cable to hot shoe mount then flash mounted on hot shoe)
So you can get away with dropping a lot less for a manual flash setup... Why else does it rock? Well, TTL does all that fancy pants trigonometry stuff to do all the busy work for you with each and every shot. That means the flash output will be or can be different with each shot or composition change that you make. This could be an issue and give you inconsistent results from one to another... It's sort of the Matrix metering system but for flashes you know? Therefore you have to ride the flash exposure compensation.
Here are a couple example images that were shot with Manual Flash:
We were in a tight space in this alley and I couldn't rely on my lighting system to work in TTL mode. Also, it was dark enough where I didn't need a fast shutter speed to dial down the ambient light so I hooked up my PocketWizard Plus II receivers and shot in manual mode. All I needed to do was set my flashes up once and I could spend more time shooting and less time fidgeting with my settings.
With manual flash however, you set it and forget it... Position subject at X put light stand and flash about arms length away from them at Y, dial in your settings and every shot will have the same flash output... DONE! Unfortunately, there are bad things about this setup. The most annoying issue is your camera's stupid sync speed. The way SLRs work is that the mirror flaps up and the shutter opens for x seconds and closes and then the mirror flaps down... Many cameras have a standard sync speed of 1/200", 1/250" or even a 1/500" (like on the Nikon D70s) but check your camera manual to see what yours is... It is the maximum shutter speed that you can use when shooting with a flash. Plain and simple. If you shoot at that shutter speed or slower then you are all set... Shoot faster than the sync speed and welcome to 'blacklinesinmyphotosville'. What that nice long line is at the bottom of your picture (or left or right side if shooting portrait) is that your exposure was so fast that it didn't give the image enough time to get the full effect of the flash because it closed up too quick.
All in all, as mentioned before, I use both methods. There is a time and place for both of them. I use TTL and high speed sync when I want to shoot portraits and want overpower the sun... That means I can dial down the ambient light and get really cool portraits that are just top notch... If I were to do that in manual mode then I would need a lot more flash power (enter studio strobes and power packs which cost $$$$) to get my shutter speed slow enough so that it falls into the sync speed of the camera....
So that gives you the rundown on what your options are as far as flash modes are concerned. The next part will discuss how to go about quickly set your gear up and dialing in your settings so you can spend more time shooting and less time fidgeting with your it all. Not a bad deal right?
*Sample images coming soon
Be sure to comment on this post and let me know how you use your flash. I know there is a lot more information on the subject. This is meant to be a nice general overview of things to get people started.




.jpg)