8.02.2010

Downsizing My Equipment For 2011

Anyone who knows me knows how I like to spend! It seems like I have every photography gadget and gizmo out there! Over the past couple months I have been considering downsizing and going with the "less-is-more" approach to my photography. I know that the internet and forums make it real easy to want to buy everything that is out there but trust me! You only need a couple things to be able to take amazing photos. The rest is up to you to make your images sing!

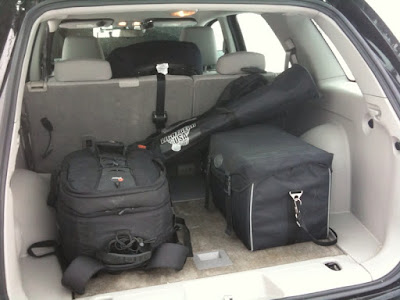
photo of all the camera equipment that I used to take with me to every photo assignment


I haven't made any drastic decisions yet but have been really considering selling my Alienbees studio strobes, Hasselblad medium format camera, gizmos and even a couple lenses (email me if interested).


It all fits in my bag, it is all nice and versatile and it simply works! I rarely do studio stuff anymore and don't feel like carting around all my studio strobes and ac power packs when doing shoots. It takes longer to setup and I feel that it can be overkill. I can pull off almost anything and everything with the gear listed above and don't have to worry about carting more stuff along.

You may be asking why I am cutting back...
Good question, see over the years I have fallen into the black hole of marketing and felt that I needed anything and everything that is out there. If it's new then it has to be the best... Well, a lot of that junk accumulated over time and I had too much stuff. There was no way I could use it all at a photo shoot. So I am going back to my roots and am minimizing my lenses and what I take with me to my photo shoots. Less is more...
Thanks!
~Mike

7.31.2010

inLIGHTin'ed Lightroom Presets Now LR 3 Optimized

Has anyone given Adobe's Lightroom 3 a run yet? It has been out for a little while now and I have been working on my inLIGHTin'ed Presets to get them optimized for it.

Well, great news everyone, my inLIGHTin'ed Lightroom Presets are now ptimized for Lightroom 3!!!

Please email me at inlightinworkshop@gmail.com if you purchased the old presets and I will gladly get you an upgrade free of charge. Just be sure to reference your e-Junkie / Paypal transaction # and I will get it to you ASAP. I am also really pleased to announce that I have been using e-Junkie to handle all the payments and also to provide you with an immediate download link. No more waiting for me to get to a computer and email you them. I know I hate waiting for stuff and I am guessing you do to.

If you don't have the inLIGHTin'ed Presets yet then now is your time to jump on-board! With presets such as "Instant Awesomeness" and my "Nostalgia" effects, you'll be sure to save a boat load of time in post-processing and a lot more time having a life... And there are 70+ more presets that I didn't even touch upon that will rock your world. If you own Lightroom (Win or Mac version) then you can use these presets.


You can purchase the inLIGHTin'ed Presets by clicking on the button below:
PRICE: $75
Buy Now


Thanks!
Michael

PS. Be sure to comment below and let me know what you think of LR 3 or even let me know how you like your inLIGHTin'ed Lightroom Presets.

6.28.2010

Essential Off-Camera Lighting Gear

I have been really minimizing my equipment over the past couple months and following the KISS (keep it simple stupid) approach to my photography. I thought golf was bad but I really think that photography has more gear and gadgets than anything else.

I used to bring out the big artillery for my wedding and portrait assignments and a lot of it wasn't needed. Sure a studio strobe and AC power pack is nice to have... But my speedlights and high speed sync techniques can also do the trick. Throw in some nice light modifiers such as a soft box or shoot through umbrella and I'm in business.


I did add the prices to show you how much each item goes for. As you can see, it can get expensive!

Want to save a bit of money? If you shoot Nikon then you can do without a second SB-900 speedlight if your Digital SLR has a pop up flash and is fairly current. You can use the pop up flash to act in Commander mode only and trigger your one SB-900 that way. This will also allow you to get away from needing those two PocketWizards. Let's tally that up for a savings in the ballpark of $797.95! The only con here is that you are going to be limited by the flashes and they need to have a direct line of sight. BUT you get to use high speed sync which is an amazing thing if you get the hang of it!

5.07.2010

Introduction To Digital Photography

As you may or may not know, I frequently host very rudimentary photography classes in the community. These are for clubs, organizations and even schools. I'm not good at many other things so this is something that I can do togive back to the community that I love so much. On that note, if you are reading this and think that a photography class (intro or advanced) would be great for your club or organization then shoot me an email at inlightinworkshop at gmail dot com.

As a matter of fact, I will be teaching an Introduction To Digital Photography class at our local Gilda's Club of Western New York today from 6:00pm-8:00pm. This class will be talking all about the basics of digital photography and is heavily geared towards point and shoots (what to look for, how to use one, etc...)

Way back when, I got the chance to try out Prezi which absolutely blows Microsoft's Powerpoint out of the water. If you do ANYTHING that involves public speaking or giving presentations then I would highly stress that you try out Prezi.

Anywho, I embedded the Prezi Presentation for everyone to check out at their own leisure.
    It covers:
  • Types of Digital Cameras
  • Camera Features
  • Bells & Whistles
  • ISO, Aperture & Shutter Speed
  • Camera Settings
  • Post-Processing
  • Prints & Products
  • Post-Processing
  • Composition


~ Enjoy!
Mike

5.01.2010

Before You Buy That Lens...

... you heard me.

Before you lay down the cash on your next lens consider purchasing something that will make your images look better.


Calibrate Your Monitor | inLIGHTin Workshop


The device pictured above is one of the many monitor calibrators that are out there today. I included a picture of the ColorMunki by X-Rite and it is my personal favorite. The ColorMunki is affordable (under $400) and not only allows you to calibrate your monitor, your projector and even your printer as well. This is great because you are ensuring that your images are accurate from capture (use a gray card) to your screen and finally to the print. What you see is definitely what you get.

So why am I stressing a monitor calibrator over getting that new camera or lens that you have been drooling over? Simple. I want your past, present and future images to look good. Chances are that your monitor is not properly calibrated so all the images that you have been editing on it are probably way off from what their true colors should be. They may look good to you on the screen but wait until you get a print back of one!

Here's the nitty gritty details on why you should calibrate your monitor:
All computer monitors are not created equal. The settings and colors are pretty out of whack by default. The big problem comes down to when you are editing your pictures. Say you used a gray card and took a properly exposed image using an accurate white balance setting... Great. However, you may get back to your computer and the image will appear too cold or too warm. Definitely not how you saw it on your camera's LCD... So you have no worries and make the image warmer or cooler and then send it off to print.

When you get the print back it is totally screwy and the colors are WAY too cool or WAY too warm. Must be your camera right? Time to get a new one... WRONG!

It is because your monitor was fooling you into thinking your image was incorrect. You over compensated when you shouldn't have and the only way you can tell is in your print.

A monitor calibrator ensures that this does not happen anymore. All you have to do is re-calibrate your screen every month and you should be all set and on your way to better looking pictures.

A monitor calibrator will prevent your images from looking, well... like crap. See, back in the film days, your photo lab would process and develop your film for you. They were your post-processors and you didn't have to do a thing. With digital, WE are each on our own. Now if you don't have a monitor calibrator then you have not been

4.27.2010

Stop Using Program Mode!

There are well over 2.5 million people out there who own a digital SLR camera... That is absolutely awesome! Digital SLRs are where it's at! Sure they are bigger and bulkier but they produce a much better image overall and allow you to do a whole heck of a lot more than what a point and shoot can. However, they are only better when you throw a little know how into the mix.... If you take the camera out of the box and keep it at Full Auto or Program Mode then you are really limiting the camera's true potential and are essentially just making it one big, overpriced point and shoot.

There are three main camera settings that will do the trick. If you memorize these three the same way you know your name, address and phone number then you will be off to a real good start.

I wrote up a nice detailed blog post about shutter speed, aperture and ISO that you should definitely check out here:
Shutter Speed, Aperture and ISO Explained


Please remember at least that there are other settings beyond Full Auto or Program Mode. It isn't all about what brand or model of camera you have either. If you have an old DSLR then it all of a sudden isn't broken or obsolete when a new model comes out... That new model will not do everything for you either. It takes time and work to be a better photographer. I have been shooting film a whole heck of a lot more lately so imagine how "obsolete" I must be with my $300 film camera??? Yet, I am getting some of my best work out of it!

Listen, If you want to make your pictures look better or if you want to take your photography to the next level then you have to play around with Manual Mode and Aperture Priority Mode. I am going to just briefly talk about Aperture Priority mode for sake of boring you to tears so listen up and listen closely.

Aperture Priority Mode is one of the camera settings on almost every digital SLR out there. 9 times out of 10 I find myself being more concerned with depth of field (or lack thereof) than worrying about motion blur or camera shake... Therefore, Aperture Priority is PERFECT! You set the ISO and you pick the ideal aperture for what you are shooting and the camera does the rest and decides on the shutter speed for you. There is a nice button on the cameras that has a little "+/-" icon on it. This is the Exposure Compensation button and you can set this to a higher or lower value and it will tell the camera that you actually want your image to be brighter or darker than what it is going to "assume" you want. I say assume because a camera is just a tool and it can (and will) get fooled. From experience, I can tell you that photographing someone who is strongly back lit requires around +2 exposure compensation and typically 0 to +1 for pretty much everything else. I am mostly a portrait photographer so my subject's are always people. Things are different if you shoot nature, wildlife or landscapes and you may need to use the negative exposure compensation.

Now you're probably asking yourself "but what should I set my aperture to? I'm scarred help me!" No worries people.

Just remember, a good rule of thumb is to set your Aperture value so that it is equal to or greater than the number of people in your picture. If there is one person in the picture then use f/1.2 or higher. If there are two people then f/2 or higher. For five people, use f/5.6 or higher and so on... If you are shooting landscapes then a good default is f/16 to ensure that everything is in focus.

The only hurdle you may encounter with this guideline is that your lens may not allow you to go lower than f/4 or f/5.6... This is common in kit lenses that come with the camera body in a set. However, this is the beauty of being able to change out lenses. You can add to your gear slowly but surely and phase out the kit lenses in lieu of ones that do what you need them to. If you want to go a little nuts while not spending a fortune then check this lens out. It's great for portraits of your kids and stuff like that where you may want a shallow depth of field. The lens is a 50mm prime lens (no zoom). It has a fixed aperture (that won't change on you when you zoom obviously) and allows you to be able to shoot in real low light or so you can have real shallow depth of field all courtesy of that f/1.8 aperture. All this goodness for a modest price of $125 or so:

For Nikon:
Nikkor 50mm f/1.8 lens at B&H


For Canon:
Canon 50mm f/1.8 Lens at B&H


For Sony:
Sony 50mm f/1.8 Lens at B&H


B&H Photo Video has the best prices and I use them all the time so they are a great company with great customer service. You can't get that off eBay or from a no name company that no one has ever heard of. Stick with the companies who are legit whenever you consider picking up new camera gear.

That's all I have for today. Thanks for stopping by!
~Mike
4.10.2010

Shutter Speed, Aperture And ISO Explained

Who could imagine that these three terms could stump so many people? I don't know about you but I wanted to control the camera ASAP when I starting off and didn't want my camera to control me. So turn your camera off auto 'P'ilot and let me help you get a grasp on shutter speed, aperture and ISO once and for all. Ready to turn that dial to Manual mode???

First off, these three settings are meant to be used in conjunction with one another. It is one big balancing act where you focus on one setting over the others in order to do different effects with your image. They are to photographers what various paint brushes are to painters.

I will talk about each setting in the order in which they should be addressed before you take a photo.

ISO: Also known as ASA back in the film days. This is the first setting you should address when you pick up your camera. The ISO is something that you set based upon what you see. If it is real bright and sunny outside then you will want to use a LOW ISO number like 100. As the natural light around you gets darker, maybe you are in the shade or indoors, then there is less ambient light so you will need to use HIGHER ISO values like 400, 800 or more. The ISO is a setting that you control based upon your surroundings. In case you care, the ISO is your film's (or digital sensor's) sensitivity to light. The lower the number means the more light needs to be used to affect the exposure. Just remember, that the higher the ISO is, the crummier the image may look due to noise and grain to being introduced.

Aperture: The next setting you should move to is the Aperture. Aperture is a the one trouble setting that is VERY hard to understand. The aperture is measured in f-stops. The higher this value is means that less and less light is entering the camera. The higher the value also means that more and more of what you are photographing will be in focus. If you are still confused then just remember that your Aperture should be set to a number that is equal to or greater than the number of people you are photographing. If you are taking a picture of your dog or child then you can use an aperture of f/1.4 or higher. If you are shooting both your dog AND child then you should use f/2.8 or higher. If it is a family portrait of FIVE family members then you should set your camera to f/5.6 or greater... Get the picture? This should hopefully help you demystify the elusive aperture!

Shutter Speed: This is all that's left now that you have two of the three settings figured out... This is the home stretch. The shutter speed is what freezes or blurs motion. Sometimes you want your image to convey motion or sometimes you want everything as sharp as a tack. Since two settings are already figured out all you really need to care about it looking at your the light meter that you can see in your viewfinder.

TANGENT: The light meter is your bread and butter. It is simply an indicator of how your image is going to look if you take the picture with those settings. If the needle on the light meter is too far to the negative then your image will be too dark and vice versa if the needle it to the plus. I typically aim for +0.3 or +0.7 for the most part.

So with this in mind, set the shutter speed to either a higher number (to center the light meter if you have too much light) or lower one (to let in more light) until the needle in the light meter is centered. The only thing you need to check is if the shutter speed is less than 1/60" of a second. Anything slower will introduce camera shake and your image will suffer. Just make sure your over 1/60 and you should be good to go for just starting off. If you simply cannot keep your shutter speed over 1/60" then this is a good indication that you don't have your ISO set up properly. Go back to the drawing board and use a higher ISO and go from there.

Still need more light? Move to a brighter location or throw a flash on your camera.

Hope this helps!
Mike