Nothing is more important than backing up your data. Unfortunately, this is something that gets pushed to the wayside so we can get a new camera or lens gets. What good is all that camera equipment if we lose all the images taken with it???
It all boils down to storage... Here are some helpful suggestions on how you can preserve your images for years to come: 1.) Do not format your memory cards until you have backed them up. It is important to have yourself "at least" two copies before formatting your memory card!
2.) Invest in quality not quantity. It is easy to see a hard drive for $80 and want to pick it up. However, be sure to do your research and make sure that these hard drives are reliable. We wouldn't want to get into a car that wasn't reliable and take it for a drive across country now would we? Same goes for your hard drives.
3.) Go for speed. Look for hard drives in the 7200rpm or faster range. Also ensure that your external hard drives have various input jack options. These 250 gb rugged external hard drives by LaCie are portable and can withstand a good beating. Trust me, I have tried and they are still kicking!
4.) Things are always better in pairs! Do your research on data redundancy and set yourself up a nice RAID system. The basic nuts and bolts of RAID is that you can have your hard drive mirrored meaning that one could crap out and you will have an exact replica to takes its place. Furthermore, you can put a new hard drive in the old one's place and have the RAID mirroring kick right back in. LaCie also makes amazing products for redundancy. This particular model is the LaCie 5 Big Network NAS file server and it can expand to offer you up to 7.5 Terabytes of data!!!
Front:
Back:
5.) Upgrade your CDs and DVDs from the Walmart brand to archival grade. The cheap DVDs have an average shelf life of like 5 years. Go with the more expensive, but more reliable, archival disks. These last well over 90 years and are more scratch resistant.
6.) Keep a backup off-site. Take one of your hard drives or keep a running record of DVDs and send them over to your mother-in-laws house. Just keep them somewhere safe and away from where you keep your other hard drives. This goes with the saying about having all your eggs in one basket. Heaven forbid you had a fire or a natural disaster hit your house... Having an off site backup ensures that you have one copy somewhere else that is hopefully going to be out of harms way.
One can get pretty overboard with backups so be sure to do your research and follow a backup regiment that will suit your needs and fit in with your already existing workflow.
To pose, or not to pose: That is the question. A question all modern day wedding photographers have to face. Today’s bride is all about “photo journalism.” It’s getting to the point where they turn their head anytime someone mentions the word “pose”. However, do they really know what this term means or did they just see that buzz word in a bridal magazine?
Photojournalism, documentary, and lifestyle photography are all synonyms. They all mean that the photographer will be unobtrusive and capture those special, candid moments as they unfold. But what does a photographer do when these special moments are few and far in-between? What do you do when the story unfolding in front of you is the bride’s father not approving of his future son-in-law, or when the groom is having second thoughts or when the couple is getting married for all the wrong reasons? This may seem far-fetched but I can guarantee that it’s happened before.
A true “photo journalistic” photographer should be capturing these fights and lack of love in each other’s eyes the same way true photo journalists do when in the heart of war zones. However, do you think the bride will be happy to see these moments in her wedding album? Me either. So what do we do as photo journalistic wedding photographers? We’re damned if we do and we’re damned if we don’t.
If we don’t hang that shingle out there saying we shoot in a photo journalistic style then we won’t get many bookings. Brides want what the magazines tell them because posed photos are old fashioned and dated. However, if they see their true wedding then they may not like what they see. No one wants a wedding album with a spread of the groom sweating bullets and getting ready to flee to Mexico minutes before the ceremony or the couple just going through the movements without any love in either of their eyes.
My solution is to create a happy medium between the two.
First, I think it is absolutely essential to educate the couple when you meet with them. All of this can be very new to them and most of their information comes from recently married friends of theirs or from magazines. I’ve seen brides asking for photo journalism one minute, yet taking out their plan book and showing me a handful of images that are nothing of the sort. The photos she takes out have been posed shots brides on gondolas in Venice or on a secluded beach in Hawaii. Yes they look amazing but they were most likely taken by a fashion photographer and are very farfetched from the norm. This just goes to show you how no matter what, every bride wants to look like a princess and they want their day to be like it was out of a fairy tale. Educating the bride will let them know how weddings typically run and to let them know that powerful images like the one’s she is showing require a large amount of pre-planning. It probably isn’t in their budget to fly everyone down to Venice or Hawaii but amazing photos can be taken really quite anywhere. It just takes a lot of grunt work, scouting and planning to find a place that is elegant and unique.
Secondly, I tell them how I photograph a wedding. This is where I mention how I “coach” the couples to create these memorable photos. I tell the couple how I offer them tips and pointers throughout the day to make the best images possible. This could mean telling them to sit by a tree together and just talk and be cuddly or even to just tell them to keep doing what they are doing, just a couple steps over so they can be in better light.
Lastly, I strongly recommend that they book my engagement portrait session. Here, I explain that it is a learning experience for both of us. I am seeing what works and what doesn’t and I get to know the best ways to photograph the two of them. On the same token, they get a chance to warm up in front of the camera and to get comfortable with it so that it will all be second nature on their big day.
When it comes to the shoot, I do exactly the things I mentioned to them and really try to keep them engaged and involved in the whole process. I treat things more like an experience than anything. I want them to feel just like they left an amusement park when I am done with them.
This coaching technique can lead one to “machine gun shooting” if you aren’t careful. Over time however, you begin to hone in on your technique and you begin to anticipate the moment that is essentially just how a photojournalist would… The only difference is that our photos will be taken in better light.
I wanted to go over my recent inLIGHTin Workshop for today's Friday Night Lights segment.
I gave an inLIGHTin Workshop to about a dozen photographers over at the iPrintFromHome.com Headquarters over on Niagara Falls Blvd. For those local to Buffalo... did you know that we have an awesome photo lab right in our backyard?
So we started at 6pm and went a little over three hours! This workshop was all about lighting. We talked about everything from free and available light, to continuous light, speedlights (on and off camera) and ended up on studio strobes... There was A LOT of content and could have easily spent an entire day talking about things...
I had a great time and wanted to thank everyone for attending. I hope to see you at other workshops of mine and as always, call or email whenever if you have any questions guys!
Here are some pics from the workshop that my assistant, Martha, shot during the workshop:
Thanks to the George and Sarah over at the iPrintFromHome.com family for letting us use their space.
What better time to review the Nikon AF-S 70-200mm f/2.8 VR when a new one has been announced right?
Basically, I just wanted to let you know that this lens is still going to be used by myself and I do not have immediate plans to upgrade to the new 70-200mm with VRII...
Here are the differences real quick between the old model and the new one:
1.) Price! I paid around $1,800 last year from my 70-200mm while the new one appears that it will be going for around $2,400.
2.)VR vs. VR II: You basically get an extra stop of light with this newer version VR. The old one states that you can handhold the lens and get an additional three stops out of it while the new one is rated for four stops.
3.) Lens Coating & Design: The new VRII lens has the nano-crystal coating and sports a new design to boot.
4.) Minimum focusing distance has been dropped from 5 feet to 4.5 feet or so.
5.) The VRII lens is about a quarter inch shorter than its predecessor. However, it is approx. 2.5 oz. heavier.
6.) Sharpness: The new VRII is supposed to have better edge to edge sharpness on the new VRII lens.
7.) AF: Faster focusing with the A/M, M/A and M options.
So if you think that the extra $600 will help out your photography then put an order in for one of the new VRII versions... Otherwise, wait it out and continue to rock it's predecessor.
I personally love my current lens. The important things are that it is fast to acquire focus, it is sharp (even at f/2.8) and it is comfortable in the hands. Need I say more? This lens has some amazing bokeh (that is the term given to the aesthetic quality of the blurred out background in your image when using a shallow depth of field)
I chose to do this review actually because I have been using this lens for more and more of my work as the days go on. My full frame D700 rocks with this lens. I did find that DX crop cameras give me a little too much zoom (approx. 105-300mm focal lengths after considering the crop factor) for my wedding and portrait needs. This lens coupled with a 2x teleconverter on my D300 DX camera gives me an effective 600mm f/5.6 (you lose a stop of light with each x in the teleconverter so my f/2.8 bumps up to f/5.6) Not too shabby! So all in all, I can use this lens with either a DX or FX body and for various photography assignments.
The image quality of this lens really excels when shooting wide open. Here are some sample pics from a job that I just did where the 70-200mm was used at f/2.8:
This lens is a staple for Nikon shooters. There are a couple other "necessary" lenses in Nikon's lineup that you should have with you. The 24-70mm f/2.8, 50mm f/1.4 would have to be the other two that I can come up with. Enjoy and check back tomorrow for some awesome workflow techniques!
1.) Use a tripod. I think that one is self-explanatory. Tripods stabilize your camera and ensure that your shots will be sharp. A lot of photography techniques, such as blurring waterfalls, requires a steady camera and a long shutter speed so we need that camera to be steady. I also should point out that you should look into also using a remote shutter release to also prevent any unnecessary camera movement. If you wanted the benefit of this on the cheap or if you forgot to bring your shutter release with you then you could always use the timer feature of your camera. Set it to 2 or 5 second delay and that will ensure that the camera isn't affected by you pressing the shutter.
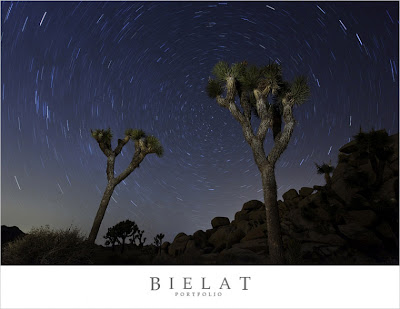
Using a tripod allowed me to take this 16.5 minute star trail in Joshua Tree National Park. Good luck hand holding your camera that long!
2.)Use Mirror Up Mode. I am not sure if every camera has this feature but it further prevents any camera movement at time of capture. With this setting enabled, you press the shutter once to snap the mirror up and then the second photo simply takes the exposure without any internal mirror snapping. Anything to reduce movement on the camera.
3.) Do your Research. If you are planning a trip somewhere or are ready to go out and shoot then be sure that you know when the sunup/sunset times are, what the weather is like (and dress appropriately) and where the best setup locations will be. "Chance favors the prepared mind" so the more prepared you are going into the shoot, the better your images will be. A GPS is also your friend and is a great tool for landscape photographers.
4.) Invest in Filters. Certain filters are essential to taking amazing images in camera. Sure we could take multiple shots and HDR them but I am talking about technique here. Many have the "I'll fix it in Photoshop" approach to photography which I am trying to break one person at a time here. If you are just starting out then HDR your heart out until you can save up for decent filters. Call me old fashioned but I want to see an amazing image on the back of my camera in order for me to feel good about an image. Many times, this requires the use of filters. I would recommend circular polarizer filters (reduce glare and gives images more of a color pop in-camera.), ND filters (Come in various levels of intensity. These darken the overall exposure and allow you to shoot at slower shutter speeds), graduated ND filters (these are gradients that go from dark to clear. Their purpose is to darken the sky and even out the overall exposure of a landscape) and filter holders (such as the Cokin Z-Pro).
5.) Be Unique. There is only so many ways someone can take a photograph. If you are visiting a popular location frequented by photographers year round then chances are you will be taking a photo that looks just like theirs. Be unique and come up with different ideas. Maybe shoot details around the area, use tighter crops, try panoramas or use obscure things in the foreground. Just be different.
6.) The Early Bird Gets the Worm. Be willing to venture out early enough to catch sunsets. This means waking up well ahead of time, getting a good breakfast and get out to your location wit your camera ready to go just before sunset. Remember "chance favors the prepared mind." If you are a late riser then there is always sunsets to look forward to. The reason for this is that the sun isn't at an extreme such as high noon and the light is essentially fanning across the landscape. The colors in the sky are also the most impressive during these times.
7.) Composition is Key. Remember the basics such as the Rule of Thirds, the Golden Ratio, triangles, figure eights, leading lines and other compositional rules. Always strive for a foreground, mid and background to give a sense of depth and dimension. If you want to portray size then try to always have something in the photograph to serve as a reference. This could be a person hiking while you capture a majestic mountain. As always, rules are meant to be broken so if it looks good to you then chances are you have yourself a winner. "There are no rules for good photographs, there are only good photographs." - Ansel Adams
8.) Bracket Your Shots. I've had it happen to me where you get so caught up in the moment or things are a rush so you may forget to check your settings or your exposures on the back of your camera. By bracketing your shots, you can ensure that you will at least have a couple usable images from the set. On that note, always run through your camera settings to ensure they are set to what you want. For landscapes, I recommend using the largest RAW file in Adobe RGB. This will give you larger files but they will have more data and contain the most color. Film was expensive but memory card real estate is cheap so use up those memory cards. It only will cost you more time behind the computer when going through them all.
9.) Travel. Life is short. Go out and see the world. Unless Yosemite or Yellowstone is in your backyard then chances are you will have to travel some to get great images. Sure you can look for some gems in your backyard and search for local getaways but the real magic comes when you do a little traveling. I know I get burned out living in the same spot with the same things to photograph... Traveling to a new location is an eye opener and serves as a much needed revitalization. I find a whole new level of inspiration when in a new state or county. Take the wife and kids or go on a photo safari by yourself. Exotic animals and unique landscapes will not be ringing your doorbell so you have to go out and search for them. Just be safe and take a guide with you if you are unsure of your surroundings or what you will be getting into.
Not everyone has one of these in their backyard! Photo taken in Chichen-Itza, Mexico.
10) Get To Know the Area. Camp out and become a part of what you are photographing. The moods and feeling you get should be the fuel for your photographs. When you understand what you are photographing then you will be able to truly capture it's essence.
This photo tells a story to me. I shot this image after proposing to my wife in Allegheny State Park. Don't tell me that it didn't have an effect on my feelings. I find this image to be very calming, mysterious and pleasing to the eyes. I could go on for hours about this one since I think it is my favorite image to date.
Ansel Adams said the following quotes that should really hit home: "A great photograph is one that fully expresses what one feels, in the deepest sense, about what is being photographed. "
“Simply look with perceptive eyes at the world about you, and trust to your own reactions and convictions. Ask yourself: "Does this subject move me to feel, think and dream? Can I visualize a print - my own personal statement of what I feel and want to convey - from the subject before me?”
“You don't take a photograph, you make it.”
I hope this helps in your quest for better photographs.
I was pretty lucky that the stars aligned fairly well for while in California. I came back with a lot of great images that I obviously couldn't have gotten here in Buffalo. Not too many cacti or mountains around here ;P
I am still going through images from the trip and it inspired me to write this little article here.
So many people focus on camera equipment and computer software but forget that great images simply require you to do your time.
What I mean by this is that the stars essentially have to align with you being there right smack dab in the middle of it all. Sometimes, you being there is fate. There is no easy way to call it anything else. It is just you and the shot right there at the right time. I have seen many powerful images through my various workshops and speaking engagements. These images were taken by self-proclaimed "amateur" photographers. They were at the right place at the right time and snap, they captured it beautifully. However, these powerful images in their portfolio were few and far in-between. It is my goal in this article for you to capture more of those powerful photographs time after time.
I think that Louis Pasteur nailed it best when he said: "Chance favors the prepared mind."
I have been hanging on this quote ever since I heard Ansel Adams say it. He was no slouch when it came to inspiration quotes either. Here are some of my favorites:
"Sometimes I do get to places just when God's ready to have somebody click the shutter"
"A photograph is not an accident- It is a concept."
"The ‘machine-gun’ approach to photography – by which many negatives are made with the hope that one will be good – is fatal to serious results."
"Twelve significant photographs in any one year is a good crop"
All of these quotes hold great value to me. How many times do we find ourselves guilty of "machine gun" shooting? I know I am an offender at times. How many times do we put together our portfolio together with quantity in mind and not quality? A portfolio is only as strong as its weakest print. Remember that.
So back to the topic at hand, doing time. For me, taking the time out to research and study what I am about to photograph. If I will be photographing some place local, I will go to the site and scout out the area. This comes in handy but what if you happen to be at the right place at the right time? You better be on your game to make the shot. Here is an example of just being at the right place at the right time.
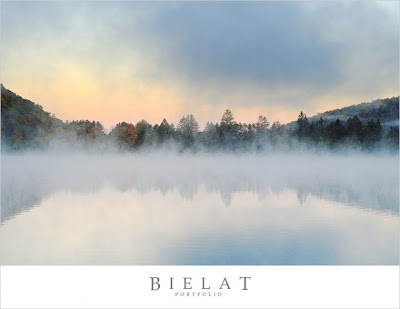
The next shot wouldn't have been anything special if I didn't get up at the crack of dawn. If I waited any longer then the fog would have rolled out and the sky would have lost all that overcast:
This next photograph happened to be me being there at the right moment. My camera gear was out and equipped and I waited patiently until this turtle decided to swim by and make his appearance. My camera settings were right and all I had to do was press the shutter...
It isn't always easy for the amateur photographer to dedicate this much time to their hobby. Sure they have a nice camera but the 9-5 job, family and other factors can easily make it so one cannot always get out to take pictures. This means that the few times they actually can get out to shoot might not be the 'right' day. The light may be horrible, their may be no cloud cover, the seasons may not be right or it could be a slew of other reasons.
So just remember "Chance favors the prepared mind" so just sit down and do your research then you will have much more eventful shoots.
I have been goofing around with the Nikon D90 for some time now. I wanted to iron out all the kinks before offering this photo/video fusion to my clients so here is a sample video my wife and I shot just today. As you can see, it is of my little guy, Cameron, and his first time eating solid foods. This is just a quick run of how quick video can be taken and edited down to a decent home movie or more...
I shot this video using a Nikon D90 and a Nikkor 24-70mm f/2.8 lens. A monopod was used to stabilize the camera some and everything else was pretty much pretty basic. The video was shot in the highest high def quality that the D90 offers (720i) and then converted from AVI to MOV format on my Macbook Pro. iMovie '08 was used to edit the video and throw in the titles, transitions and music.
All in all, it took about 1 hour to edit around 40 minutes of video down to the 6.5 minute movie that you see here:
Here are my initial thoughts about the D90... D90 Pros:
- I love how easy it is to shoot the video and it is all on the SD card for quick transferring over to my computer. My High Def camcorder uses miniDV tapes which is a REAL pain to get the video to my computer. This isn't an issue with video being on an SD card.
- 720p High Def quality is still awesome! Don't tell me "Joe Six Pack" (yeah I'm bringing it back) can tell the difference between 720p and 1080p...
- A couple button clicks and you are recording high def video easily. It took my wife 2 minutes to get her groove on with recording video and applying her artistic eye on things. Don't let her know but it only took me 1 minute ;p
- Quiet: The shutter isn't loud when taking still captures.
D90 Cons:
- Camera shake when shooting video. The camera body is so light that it is easy to wiggle around.VR lenses will help but there aren't too many in Nikon's lens arsenal that are fast enough and worthy for all around use. My only VR lens is the 70-200mm and good luck keeping the camera steady hand holding that bad boy. I am using a monopod to steady the camera but a stabilizer will definitely be my next purchase. I may purchase the battery grip down the road to help weigh this camera down.
- Blur: The only fast and responsive way to focus is manually. The 3" LCD screen helps to judge your focus but it isn't always perfect. I like to use the shallow DOF that my lenses have so I really need to be dead on. I also like to do unique camera angles that have me looking at the LCD screen on quite the extreme angle. I look forward to how they will handle this is future camera models.
- Jello Video: The software design of things makes it so that the video appears to jiggle like jello when panning fast or shaking the camera. This isn't found on camcorders. Hopefully a firmware update can fix this...
- External Mic: No way to add one so we're stuck with the built in one which isn't anything to write home about.
- Bumpy: Video tends to flicker or jump at times. If you don't have some sort of stabilization in place then good luck! Even with stabilization, there still are some skips it seems.
- I miss the D700 feel. The buttons on the D90 are all over the place and it is missing a lot of great features that the D700 has. It is just a pain when switching between the two but hey, it's a $2000 price difference so what do you expect? This is something that I can totally live without to save that much money.
So all in all, if you have no interest in using the video capabilities of your DSLR, whether it be the Nikon D90 or Canon 5D Mark II, at least give it a go and shoot some home movies. Nothing beats capturing video to help tell a story. I played this video back after editing it and got choked up. Would I get that if I had only images? Maybe... maybe not. I do believe that there is a place for both mediums but this really gave me a nice new view of things. My little background in videography helped as well.
Otherwise, you could utilize these capabilities to the max and begin offering video options as a service. Will these videos put videographers and cinematographers out of business? Not yet.
The photos coming out of this camera are really impressive. Nikon didn't take the D300 sensor for use in this camera but they did model the D90's sensor off the D300. So it is similar but different. Can we tell the difference? Probably not. The IQ (image quality) coming out of this camera is very impressive. I shot with it all around California and really got a lot of use out of it when needing that extra zoom. With this camera being in the 1.5x crop factor, I managed to get an effective 600mm zoom when pairing up the camera with a 2x teleconverter and my 70-200mm.
Nice and sharp, even with the teleconverter mounted. I was worried about that since I need some AF fine tuning on my D700 when using the teleconverter.
The files turned out quite nicely at ISO's up to 1600. The D90 doesn't have the extreme ISOs like the D3/D700 cameras but that is something that kept the camera's cost down I am guessing...
So I am extremely happy with this camera. It replaced my camcorder and allows me to get more creative in ways that I couldn't before. I do miss doing my video so this is a breath of fresh air and has me real excited. I find myself taking this camera with me when going out and especially when hanging out with the family for shots of Cameron. It is very small and portable so I can put it into my Lowepro Slingshot 200 bag along with my SB-900, extra batteries and a couple lenses (24-70mm f/2.8 and the 85mm f/1.8) with lots of room to spare!
If you are toying around with getting a point and shoot like a Nikon P6000 then I would recommend to just go the little extra and pick yourself up the D90. It is portable enough in my opinion without getting in the way and your photos will really shine. More than what a point and shoot can do that is for sure!