9.30.2010

Honl Photo Traveller8 Softbox Review

Honl Photographic was awesome enough to send me their Traveller8 Softbox for their speed strap system in preparation for my upcoming PPA Super Monday workshop on "Off-Camera Flash Techniques." I took it out for a spin and put it through its paces and am really, really, really happy with the results.

honl photo traveller8 softbox review

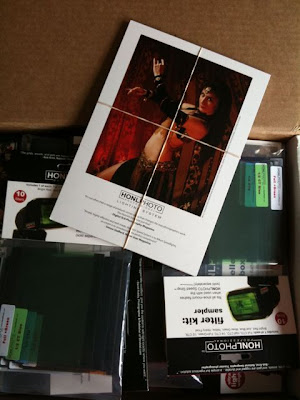
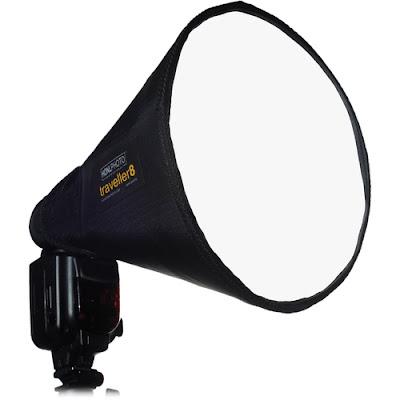
From HonlPhoto.com: "Create beautiful soft light from David's innovative new softbox design, with the quality and sturdiness you've come to expect from all Honl Photo Professional lighting products. Extremely easy to setup and attach to your shoe-mount flash unit using our popular Speed Strap (included). Folds flat to tuck into your camera bag, and weighs in at less than 4 ounces. Provides a pleasing circular catchlight in your subject's eyes. Fits most any shoe-mount flash by Nikon or Canon as well as larger units like the Vivitar 285."

The size of the softbox is roughly 11x9 inches folded and its look and feel is very rugged. It will definitely hold its own and I have confidence that it will not rip or tear even with me beating on it.

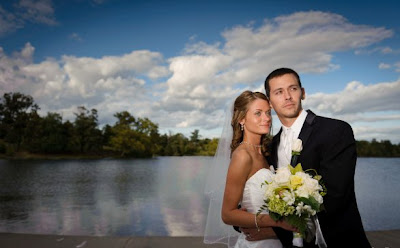
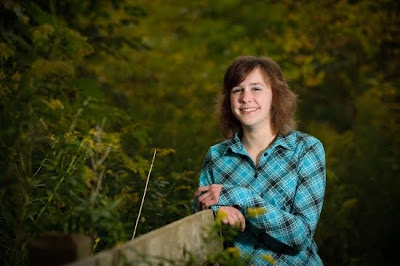
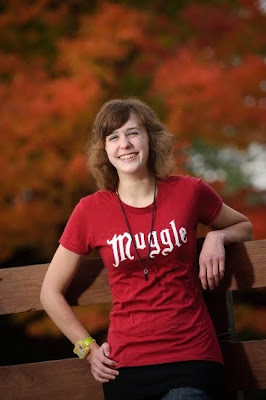
I photographed a senior portrait session over at a local park here and my setup was REAL simple. We're talking just my Nikon D700, Nikkor 70-200mm f/2.8 VR Lens, PocketWizard Plus II Transceivers, Nikon SB-900 Speedlight, Portable Light stand and the Honl Photo Traveller8 Softbox. I started shooting with a camera strap again which is nice because I can cart around my light stand with ease and throw my camera over my shoulder to free up my hands when working with my flash settings and whatnot.

Since I was using the PocketWizards, I had to shoot with my Nikon SB-900 speedlight in Manual mode. This also meant that I had to conform to my camera's maximum sync speed (1/250") and could not do any high-speed sync whatsoever.

I had to work the power of the flash, the distance between the flash and subject, ISO and Aperture to control the effect my flash had in the photo while my shutter speed simply controlled the amount of ambient light recorded. The Honl Traveller8 softbox is small enough to provide a tight light pattern on my subject and didn't really light anything that I didn't want it to. Since it is small, that also means that it won't get knocked over during windy days nearly as easy as my large 60" umbrella or 28" Westcott Apollo softbox. Due to the Traveller8's size and light pattern, I would really only use this for lighting a couple people. Any more and I would move to a larger light modifier like the 28" Apollo softbox or my 60" umbrella.

Here are some shots from the portrait session with the Traveller8 Softbox:


honl traveller8 softbox in action

sample images using honl traveller8 softbox

honl traveller8 softbox review

honl traveller8 softbox and the inLIGHTin Workshop />


The Honl Photo Traveller8 Softbox is $70 at B&H and comes packaged with a Speed Strap so that is an added bonus.

I would highly recommend this product for it's price, portability and usefulness for on-the-go lighting. I'd love to hear your thought on it if you own one too so comment below and share your experiences.

Thanks for stopping by!
Mike

9.25.2010

Thanks Honl Photographic

Honl Photographic was awesome enough to send over some great goodies for my upcoming PPA Super Monday Workshop all about Off-Camera Flash Techniques.

I think this means I will have to do some giveaways throughout the workshop.

This is really awesome of Honl Photographic to support the inLIGHTin Workshop like this so please check out their website at www.honlphoto.com and show some love.

Look at all the merch:

thanks to honl photographic for supporting the inlightin workshop


I hope to see you all on the 25th of October!
Mike

9.24.2010

Speedlights are awesome! They are portable and yet really robust as to what they offer. I guess that is why some of them run upwards to around $400+.

One of the features many have is the ability to zoom the flash head. Take my Nikon SB-900s for example, they can zoom from 12/17mm up to 200mm (on my DX/FX camera) which can give me a lot of variations of light. It is almost like a built-in snoot. Here's why: When the flash is mounted to the camera, it automatically zooms to match up with the lenses focal length and sends enough light to spread across the entire scene. Therefore, a wide-angle lens needs a lot of light spread out in order to light up everything properly. On the other hand, light needs to get thrown out, more like a "beam," when using a telephoto lens because it has to go further and cover less of the scene.

The beauty of this really comes into play when you are shooting off-camera with your flash. Take a look at the example image below:


This picture was taken at a recent wedding. I used high-speed sync to darken the background and used my flash off camera to illuminate both the bride and groom. I set the speedlight to zoom all the way up to 200mm so that it would shoot a beam of light directly on the couple's faces and fall off fairly quick. This flash was held as far out as I could in my left hand as I held my camera with my right. I used my Nikon D700's pop up flash as Commander mode only to trigger the off-camera flash for me. I believe the flash was set to +1.3ev as well. My 24-70mm lens was used here because that wide angle allows me to get in close so the flash can be close enough to hit my subjects (inverse square law 101).

Moral of the story, you don't always have time to set up and light a scene the way you want to when it comes to weddings. You have to prepare and pre-plan for these things and roll with the punches. No light stand, no softbox, no assistants holding reflectors. Just me and my flash.

Thanks for stopping by!
Mike

9.21.2010

Featured on PPA.com

The Professional Photographers of America (PPA) is the world’s largest nonprofit association for professional photographers, with more than 20,000 members in 54 countries. This association seeks to increase its members’ business savvy as well as broaden their creative scope, advancing careers by providing all the tools for success...as they have since 1880.

I am hosting a Super Monday Workshop for the PPA and they have chosen to feature me on their website:

Click here to read the entire article: http://www.ppa.com/ppa-today-blog/super-monday/super-monday-instructors-flash.php


Super excited about this one!
Enjoy.
Michael

9.17.2010

Available Lighting

Available lighting is something that I think a lot of photographers take for granted and I am guilty of this as well...

As photographers, we buy all these cool gadgets, gizmos, light modifiers and whatever else and totally over-complicate our setup.

More stuff = more problems.

This is one of the big reasons why I am downsizing all my gear for 2011. I used to think that golf had a ton of wacky gizmos but now I am thinking that photographers have them beat!

One of the things that is available to us, free of charge, is available light:


I have always tried to not book multiple outdoor portrait sessions in one single day. If you do then rock on! I prefer to shoot when the light is under that "golden hour" when the sun is setting and the light becomes softer and more easy to work with. My client gets that full hour of my time then and that light is theirs and theirs alone.

If you have ever tried doing a photo shoot under high noon sun without any overcast or shade (or worse, in a park with trees) and you will know what I am talking about! It takes A LOT more work to even out that light that you simply don't have to put yourself through. Sure you could cart along studio strobes, large diffusion tents, a staff of 12 assistants to shield the light but why bother if you don't have to??? Good luck if you are photographing children... Try moving at their speed with all that equipment!

When I was starting out I had a Nikon D100 D-SLR, two entry level lenses (variable aperture of like f/3.5 to f/5.6) and one speedlight (Nikon SB-800). I didn't have millions of things to work with yet I still got the job done. I did this by being prepared and booking my portrait sessions at logical times when the light was right.

guess what? YOU CAN TOO!

Just put your subject in a shady area or use window light to your advantage for amazing results. If your shooting outdoors, add a little fill flash (-1 ev to start) to create a catch light in the eyes for good measure.

Book some portrait jobs, build the portfolio (blog or website), book more jobs from the portfolio and keep racking in the $$$. With money you can start to upgrade your equipment. You will know what you NEED (not WANT) simply through remembering the struggles that you encounter when doing your portrait assignments. It is a slow process but a worthwhile one since debt sucks!

Available lighting... Use it!

Thanks for stopping by!
Michael

Honl Speed System Review

Honl Photo http://www.honlphoto.com has some really cool light modifiers that I have been using for quite some time now. The Speed Strap system is for flashes / speedlights only. They are portable, rugged and really fun to play with.

honl speed system light modifier review


Honl's Speed Strap system also has other accessories like color correction filter kits, color effect filter kits, gobos and a really cool 11x9" Traveler8 round softbox ($70) that I am drooling over.

The closest thing I have to the softbox is the Westcott Apollo 28" softbox but man does that guy take up some space even when it isn't folded up. Additionally, you need the flash to be off-camera AND mounted to an umbrella adapter and light stand for it all... Not my idea of "portable."

honl speed system light modifier review


honl speed system traveller8 soft box review


There isn't much to say about these things except for that they are REALLY great. The speed strap is essentially one long thin-ish Velcro strap (soft side on outside, rough side on inside) that you wrap around your flash head.

Easy to put on, easy to take off.


From there, you use the speed strap to mount the various light modifiers that I mentioned above.

honl speed system light modifier review


Yes, the speed strap itself is essentially an overpriced Velcro strap but it looks good, holds up well and can be used for so much more than just the Honl stuff.

For example, it can stay mounted on your speedlight and hold your RadioPopper PX transmitter unit in lieu of having to physically mount a strip of velcro to your flash head. You can also hook up a PocketWizard to some velcro and strap it on the Honl and run a PC sync to PC sync cable on your camera (that is IF you have a PC sync input like on the Nikon D700) and fire BOTH your speedlight AND a studio strobe at the same time... Crazy lighting possibilities all with the help of Velcro. So yeah that Speed Strap is well worth the extra couple bucks then having to ghetto rig one yourself.

If you own an entry level flash such as the Nikon SB-400, Nikon SB-600, Canon 430EX, etc which doesn't have a bounce card then you can still save a ton of money and get the Honl speed strap and bounce card for around a hundred less then having to upgrade to a better flash unit... Great way to keep your equipment and get the most out of it. I was going to do a post on making one yourself using some foam paper found at a craft store but screw it, get a Honl and it will do wonders (and won't look like an art school project from hell)

Two big thumbs up for the Honl Speed System. Highly recommended. Check out Honl Photo's website at: www.honlphoto.com

PS, I will be rocking out the Honl Speed System at my PPA sponsored Super Monday workshop that deals with "Off Camera Flash Techniques." Come on by and try them out for yourself.

Thanks for stopping by!
Michael

9.15.2010

Host A Photography Workshop In Your City

I am making a vow to make 2011 the year of inLIGHTment!

Hosting a workshop is a great way (FREE) way to get an amazing photographic eduction that is in your neck of the woods. To host an inLIGHTin Workshop, all you have to do is pick a location (such as a home or photography studio) and get people to attend. You are rewarded for your hard work by receiving a FREE Workshop Ticket (a $350+ value) and some great goodies from the inLIGHTin Workshop and sponsors.

If you are interested in having The inLIGHTin Workshop come to your hometown and do a photography workshop then all you have to do is email me at: inlightinworkshop(at)gmail(dot)com and we can get the ball rolling.

I will reply back ASAP to answer any questions and to make all the necessary arrangements.

Thanks for your support. I look forward to taking a trip to your neck of the woods in 2011!
Michael

9.09.2010

Online Photography Workshops

I did some final testing last night and things are ready to roll.

I am now offering Online inLIGHTin Workshops so you can improve your photography right from the comfort of your own home (and on your time). I have a lot of readers from across the globe and this allows for you all to experience the same learning that all the locals are bragging about.

These online workshops are are done using Skype because it is free software for Windows and Macs and allows us to not only video chat but share our screens as well (which is great for post-processing and workflow lessons).

photography workshops online with Skype

I will be offering these Online One-On-One inLIGHTin Photography Workshops for a price of $50 per hour for a limited time only. Workshop topics can consist of anything of your choosing (photography 101, lighting techniques, posing, post processing, workflow, business, etc...).

Contact me at inlightinworkshop (at) gmail (dot) com if you have any questions and to schedule a workshop. Payment is due beforehand and is non-refundable.

Keep on shooting!
Mike

9.03.2010

Photoshop... In Camera


I have been revisiting a lot of my old wedding and portrait photography in preparation of getting them touched up, re-sized and re-branded when I came across one of my favorite shots. This one was taken back in April of 2008 and that is Sherri and Tom that you see there. This photo really goes to show you how an artists technique and know-how can turn the ordinary into extraordinary to create memorable images that just "Wow". Who needs Photoshop, this 'blur' effect was done entirely in-camera. No Photoshop was used to achieve that effect here people!

Buffalo Wedding Photographer - Michael Alan Bielat Photography

So how the heck did I shoot this photo?

First off, Sherry and Tom were in on this... There guests were not. They didn't know the specifics though. All I did was tell them that I requested the DJ to play a slow song and I want them to stand still on the dance floor embracing and looking at one another until I give them the go ahead.

There reception was held at a location where they had a second floor balcony around the place. I had my Giottos tripod setup there already and waiting for me to snap the camera on.

Next was my camera settings. I needed to take a properly exposed photo but had to ensure that the shutter speed was slow enough so I that moving subjects would blur some. I was using Canon at that time. I had my Canon 5D set to ISO 400, aperture at f/2.8 and shutter speed was 1 second... THAT shutter speed setting is what gave me the blur effect. My focal length was 70mm and I was using either the Canon 24-70mm f/2.8 lens for it. This was all shot with ambient light and no flash was used at all.

I ran upstairs, hooked up my camera to the tripod and took the shot. Since the bride and groom were standing still, there was little to no blurring of them. All the dancing couples on the other hand had no idea and were moving around so they were blurry...

I DID use SOME Photoshop BTW. All I did was add a vignette and cropped in a little.

You might be asking why did I use ISO 400 and why did I choose that combo? Well, because it was a dark reception venue and I wanted to introduce blur while also having a clean file. ISO 400 seemed right to me. I could have also shot this at any number of settings:

For example:
- 1" @ f/4 and ISO 800
- 1/2" @ f/2.8 and ISO 800
- etc..

Long story short, there are many ways to take a properly exposed photograph. Where we, the photographer, come into play is in deciding on how we want to portray what we are photographing... If you are a sports shooter and want the sports player to freeze in time, then do everything in your power to have a fast shutter speed (e.g. use fast f/2.8 or less lenses and higher ISO). If you shoot landscapes then maybe you want to blur the water in a stream or waterfall. Use a slow shutter speed there...

Thanks for stopping by!
Mike