3.05.2009

Get Accurate Colors In Camera

I think it is safe to say that RAW workflow is the standard for almost all professional photographers. Even with that, I am sure there are still many pros that choose to shoot JPEG files. There is nothing wrong with either method. If the shoe fits, right? I personally prefer a RAW workflow myself but to each his own right? Applications like Adobe Lightroom further sweeten the deal for me. Programs like this make RAW workflow a breeze. Batch processing allows you to correct one RAW file and process the same settings across multiple images. Presets can be created to recollect your favorite settings and effects even. These various methods all help save you time and allow you to spend more time behind the camera rather than editing photos on your computer. For JPEG shooters, this luxury really can only be done through the use of your in-camera settings or custom actions in Photoshop. And good luck if you need to make some drastic white balance corrections!


Your in-camera white balance setting is a great asset to JEPG and RAW shooter alike. Nailing an accurate white balance in the camera is one of the biggest time savers that I have noticed. The camera’s presets come close to accurate colors but many times they still require additional fine-tuning in order to get the most accurate colors. Auto white balance is fine for a snapshot but the white balance values are all over the place from shot to shot and good luck color correcting those JPEGS! In this article, I plan on going over how to obtain the best color directly in-camera and the tools which work for me.

Color correction was always a nightmare for me. This was my primary reason for shooting RAW for the longest time. My previous gray card targets like the Whibal and so on were 'close' but I always had too much magenta or something that looked just plain off. The RAW file has a lot more leverage when it comes to obtaining the best white balance and exposure correction. Now I don’t know about you but the perfectionist in me always questioned my white balance. I have purchased my share of gray cards and color checkers but even the most expensive one is no use when you forget to take it out of your camera bag!

Well, color correction issues became a figment of my imagination once I discovered the BRNO BaLens. The BaLens replaces your lens cap and comes in a variety of sizes so it is likely to fit any of your lenses. Its design is simple; a white translucent dome, which is about the size of a quarter, sits in the center of the cap and can be swapped out with a warmer portrait dome for warmer skin times if need be. The BaLens comes with a neutral and warm dome. The neutral one is ideal for any situation where the warmer one is most beneficial for skin tones and portraits. I prefer to just keep the neutral one on and simply dial in a little warmth to skin tones in post-production if need be.

It is very easy to switch out the different domes but I could just slide the Kelvin slider a couple hundred degrees and that seems to always to the trick for me. The BaLens did require some more steps to follow. It relies on using your test image to be stored as a white balance preset in the camera while gray cards can be captured and worked with in post-production. The steps require me to take the test shot using program mode, manual focus and auto white balance. I use Program mode only for this purpose simply because it takes care of the exposure for me without me having to fidget with my exposure. My camera is set up so it doesn’t take a picture unless focus is acquired so putting my lens into manual focus bypasses this. Because of the BaLens’ design, they recommend taking the test image using auto white balance. It’s quite straightforward from there. I have the BaLens lens cap on and take a photo of the main light source (or in between the two light sources if there are different casts to acquire an average balance). The last step is for me to use that image as the white balance preset value. Refer to your camera’s user manual for instructions on how to set the white balance preset. It sounds like a hassle but I can pull all this off in half a minute tops. Yeah the first couple tries seemed like I was all thumbs but the more you do it, the faster you get. For weddings or portraits, I just make sure to spark up a conversation or have my second shooter take them for a few images while I go through the white balance settings to make the shoot flow seamlessly.

You’re probably wondering what the results are like. Let’s take a look at the differences between my old means of white balance calibration and the new. If your computer monitor isn't calibrated then don't expect to really see any color accuracy since your monitor's color is probably off in some way. I would recommend picking up a monitor calibration device if that is the case.

So long story short, the BaLens out performs all my other white balance targets. Are there better white balance targets out there? Probably. Are they as easy to use and convenient as the BaLens? Probably not.

I hope this article was useful to you. As always feel free to get in touch with me by commenting below or register with the inLIGHTin Forum and we can chat about all things photography there. Thanks for reading and take care!

You can purchase the BRNO BaLens at the following locations:

www.balens.ca

http://amplis.com

or at any of these other fine retailers:

HERE

Thanks,
Mike

2.10.2009

Kenny Kim Interview

I first met Kenny when attending Mike Colón and Bob Davis' Master Your Craft seminar down in New York City. He was very personable and ridiculously nice. On top of that, he had these amazing shirts for sale that I had to get ;P


After that, I seen Kenny everywhere I looked, every photo blog, every magazine I seen somehow up had Kenny in it! Absolutely amazing.

In a few short years, Kenny has made his way through the ranks and gotten his name out there in the industry like I have never seen before! His drive and determination has made him one of my biggest inspirations to date.

Kenny took some time out of his busy schedule to answer some questions for us.


What’s one word that describes yourself?
Kenny Kim: Personable

What’s your businesses primary area of photography?
KK: Lifestyle Wedding Photography

When did you start Kenny Kim Photography?
KK: This is my 3rd year going in full-time. 2006.
>
What first sparked your interest in photography?
KK: Shooting for collegiate sports helped me learn the techniques. I’ve been fascinated with people since I was little. I have shoe boxes full of bad photos.

What made you decide to pursue a career in photography?
KK: Earlier in my career, a mother of the bride came up to me, gave me a hug, and told me that I was their family’s best photographer. She said that but didn’t see a single image I shot. That’s when I knew I could make it in this business.

How would you best describe yourself and your photographic style?
KK: I’m fun, engaging and personable. I approach each wedding as if it was my own family’s wedding. I look for candid and natural moments.

What do you feel separates yourself from other photographers in your same profession?
KK: I make an effort to build relationships with all my clients. Better I get to know them, better results I get.

What other photographer or photographers have been a big inspiration to you?
KK: I have so many wonderful colleagues that I need to thank. Particularly - Mike Colón, David Jay, Bob Davis, Becker – They helped me to get jump start in my career in the beginning. There are many others that I love to name but the list will go on and on.

What else motivates and inspires you?
KK: I get energized by people and the dynamics that each couple brings.

What does a typical day of yours involve?
KK: Weekdays are typical. I travel a lot, but when I am at home, I get up (slowly), get some coffee and usually start out browsing the web, catch up on my email and do some editing. I try to meet with people during the day but if not, then I’m doing various things related to my business.

How often do you travel for assignments?
KK: I think I spent more time on the road last year then I did at home. Eek!

Do you have anyone else working for you? Do you outsource your work? If so then what do you primarily outsource?
KK: I outsource all my album work. I have two wonderful designers working for me. I have a degree in graphic design but I learned a lesson that just because I can do it doesn’t mean I have to do it. So I also outsource all my graphic design materials to my good friend who is also an excellent designer. As for second shooters, I get lot of inquires of people interested in second shooting with me so I usually utilize them to come help me out at weddings. I make sure they have fun and capture great images!

What was the coolest assignment/location that you have ever shot and why?
KK: I love destination weddings. Having said that, my answer to the question would be the “next wedding” I shoot will be my coolest one. I really want to have that mentality and approach to each client I shoot for so that they will get the best of my work.

What is your absolute favorite photo that you have ever taken and why?


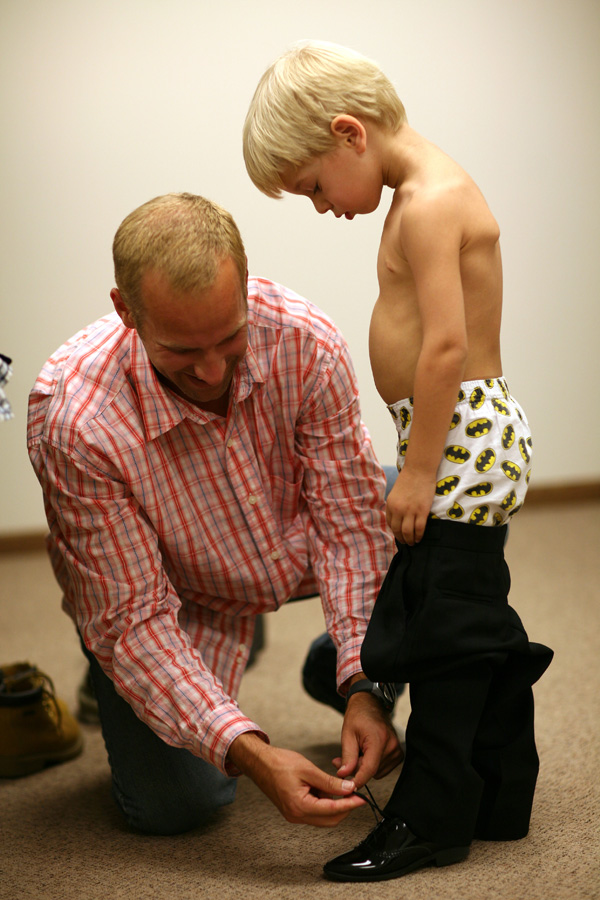
KK: I hate those “favorite questions” but this one I took back in 2006 still brings a smile to my face. I was with the groomsmen taking some shots of them getting ready. The ring bearer was one of the groomsmen’s sons. He needed some help with tying his shoes. His father saw he was having hard time, laughed and bent down to tie the laces for him. I love the relationship between them and the ring bearer’s boxers. It was a genuine moment that I was fortunate to capture.

What advice can you offer other pros out there to take their business to the next level?
KK: #1 - Make your business about serving your clients. Have fun. #2 Don’t ever forget rule #1.

When did you start doing conferences, workshops and/or speaking engagements?
KK: I have not done any workshops or conferences of my own. I’ve mainly just helped other photographers with their own workshops. (Mike Colón, David Jay, Bob Davis, Jeff & Julia Woods). I’ve been learning a lot from them and look forward to having one of my in the future. Not sure when that will be but once I learn how to fish well, then I’ll know when it’s time to teach others how to fish.

Where can we see you speaking next?
KK: I will be at WPPI in Vegas. You can find me speaking at the Pictage booth on Feb 17th from 12pm to 1pm. If you do not care to hear me speak, then come hear Robert Evans who will be with me. He’s pretty famous!

Where can we see some more of your work?
KK: www.KennyKim.com is my web site. You can also find me on Facebook and check out some of my work there!

What advice can you offer in regards to being published, appearing in advertisements and getting sponsorships?
KK: Build relationships with your vendors and editors!

What camera equipment are you currently shooting with?
KK: Canon Mark 1D III & 5D.

What’s your lens of choice?
KK: Canon 24-70mm f/2.8L

What item can’t you leave the house without?
KK: My iPhone

What equipment can’t you wait for to come out and why?
KK: Canon 14-300mm f/1.2L! If they ever come out with it, I’ll sell all my other lenses!

Are you sponsored by any companies?
KK: Boda Bag, GoBee Bags, and few others which I can’t mention right now.

Do you have any plugs that you would like to make?
KK: Please help support Thirst Relief International (www.thirstrelief.org). It's a great charity you can help support them by visiting THIS SITE. I donate 10% of all sales to the Thirst Relief International.

Thank you Kenny for taking the time out for the interview and also for also being a great friend and huge inspiration!

mike

Another ePhotoZine Article Published

I just got another article published on ePHOTOzine.com.

This one is all about "Showing What You Want To Sell" and how to make more money even in this crummy economy.

http://www.ephotozine.com/article/Tips-on-how-to-make-more-money-10847

Comment and let me know what you think!

Thanks!
Mike

2.04.2009

Want Better Looking High ISO Files

... me too.

This may seem counter-intuitive but the way to get the most out of your files is to over expose them some. I am not saying to completely blow everything out... All you need is a half to full stop over exposure to do the trick. Some may argue that this is counter intuitive since you probably upped the ISO so you can obtain a faster shutter speed but every case is different.

These sample images of my son Cameron were shot in my home under incandescent light. These images were all shot in RAW and have been directly exported from Lightroom without any modifications. I then took the exported file and re-sized them for the web.

All images were shot with my Nikon D700 and a Nikkor 24-70mm f/2.8 lens. The aperture remained at a constant f/2.8 while the shutter speed was set accordingly and ranged from 1/50" to 1/500"

Image 1:
ISO 12,800 under exposed:


Image 2:
ISO 12,800 well exposed:


Image 3:
ISO 12,800 over exposed:


Now let's take a look at how the under exposed image looks when bumping up the exposure in Lightroom approximately +.75 stops. Not too good looking huh?
Image 4:
ISO 12,800 under exposed at capture with Lightroom exposure compensation of +.75:


Here is the over exposed image dialed down -.75 stops in Lightroom. This produces a much cleaner file. The grain is there no doubt but this is at ISO 12,800 people!
Image 5:
ISO 12,800 over exposed at capture with Lightroom exposure compensation of -.75:


-------------

What do you think about this file?
Image 6:

Would you believe me if I told you this was taken with an ISO 25,600? Well it was... Not too shabby huh? I would consider that to be completely usable with a little more finesse in post.

Here is the other end of the spectrum:
Image 7:
ISO 26,500 under exposed with a +1 exposure compensation in Lightroom


Can you say yuck?

As I mentioned before, these files are un-altered except for exposure compensation where noted and a web re-size. I will try to get the full rez images up soon for viewing if you want to pixel peep the shots. Just imagine what a little noise reduction software can do along with this technique?

I would love to hear what you think so comment away!

2.03.2009

Can I Get Your Vote?

I entered in the Capital One Newsweek American Life Photo Contest and voting has begun!

So please vote for my images if you have a free second:

Image 1: Allegheny Fog
http://www.capitalonephotocontest.co...jMTFiZDQuanBn0

Image 2: Crimson Ride
http://www.capitalonephotocontest.co...0ODg1ZTkuanBn0

You can vote up to 5 times a day so please try to take a second or two out ever day until the end and vote. Look for it to take you to a confirmation page to make sure the vote went through.

I vote, enter the verification code and get to the confirmation page. From there I go back in the web browser so I get back to the image and then refresh the browser and do it all over again.

Any help would be much appreciated. Hurry because the contest ends on February 6th at Midnight.

New Article Posed in ePHOTOzine

I just helped write another article all about male and female portraiture for UK's ePHOTOzine so be sure to check it out and comment to let me know what you think:

http://www.ephotozine.com/article/Male-and-female-portriture

Thanks!

Mike

1.08.2009

ePHOTOzine.com

News about my inLIGHTin Workshop's seem to be taking off! I was approached by someone from a UK online magaine, ePHOTOzine.com, to be featured on their site because of the workshops.

ePHOTOzine TV


So over the past month, I have been providing them with content and articles and some are now available online (with more to follow of course):

Portrait Tips from the Professionals (Part 1): VIEW HERE

Portrait Tips from the Professionals (Part 2): VIEW HERE

My Bio on their site: VIEW HERE

Do I sense a UK workshop in the near future???

I have more articles that will be getting added from time to time so keep checking out their site. I would like to thank Nikita Morris over at ePHOTOzine for just being awesome!

*