Now let me start off by saying that I used to shoot Nikon back in the day. I show with Nikon from 2001 to 2006 and had myself a D100 and a D200 DSLR bodies. I simply made the switch to Canon as a business decision. I was intrigued by their CMOS sensors and full frame technology and that they kept releasing new stuff for the professional. Meanwhile, Nikon stuff was always back ordered and hard to find and they kept releasing stuff for the beginner photographer.
I can say that when Nikon does something, they do it right! After all that time, they finally released a full frame body, the D3. What an amazing camera that made Canon do a double take. I have to admit, it made me wish I still shot Nikon. To top things, off, they wait about 6 months and then release the mini D3, the D700 for $2000 less! WOW!!!
Now where do I fit in all of this? My Canon equipment has been a bit flaky all the time and the images I got were what I thought were ideal for being digital. My 20 and 30D bodies had some issues. I had some Err messages and one of my 30D's would mess up when I filled up the buffer. It would require the batteries to be taken out to get rid of the BuF message. My 5D was decent and I only had issues with having 9 focus points all in the center (the outer 8 being pointless and had a horrible time acquiring focus). I also would have battery issues saying that it was drained when it was in fact full and stuff like that. I figured a Mark III would be the "say all-be all" camera but that has proved to cause me more grief than I can say. The current state of the camera is that it currently "thinks" it acquired focus when in fact the focus is a good 6-12 inches back from where it should be. It thus has to go in for repair. I also had intermittent IS issues with my lenses and so on...
The final straw was that my CPS membership meant nothing to them and they couldn't loan me a new body until this one got fixed or anything. All I got was 7-10 business days for the repair.
Well, being a professional, I have to have equipment that I can rely on and trust. I don't want to fear that every time I press the shutter it could be my last.
I picked up a Nikon D700 last week because I never had issues with Nikon equipment before. They are hard to come by yes, but they have proven to be very reliable systems from my use and abuse when I owned them.
I shot a wedding on Saturday with inLIGHTin member Scott and this camera just blew me away. No more machine gun shooting to hope for a shot that was in focus, no low light focusing issues, no fear of using ISO 3200 or 6400. IT WAS GREAT!
The only issues I had was the fact that the camera "feel" was still new to me so I would be looking for the shutter in the wrong spot and little stupid things like that which will go away after more use.
The camera had no issues whatsoever and the files out of the camera were literally better than what I got out of a Mark III. And that is taking into consideration the 4 hour lens micro adjustment spiel and post processing / sharpening I would have to do to the Mark III file...
Needless to say, I am a very happy camper and these lenses are so sharp they could cut you...
I will post some pics when I get a second.
Thanks and let me know if you have any questions.
9.07.2008
DIY Westcott Spiderlite
So you want a Westcott Spiderlite TD5? Want to pay $415 and then over $100 for the bulbs?
... I didn't think so. The cool thing about the Spiderlite is the fact that they provide consistent lighting so you can see the effect your lights are having on your subject and it can essentially be used just like how you would use window light. I wanted to give one of these a try and I saw how simple they are but I really did not want to pay that much!
So I got the idea to make one of my own since they literally just look like 5 light bulb sockets. I jumped on the computer and Googled "DIY Spiderlite" and came across a blog post by Alex Campagna. Why reinvent the wheel if someone else already did it right?
So here are some shots and a detailed description about what I did:
Caution. This will involve some electrical knowledge so don't try this unless you can do this without getting electrocuted! I take no responsibility if you burn down your house or electrocute yourself or anything like that so do this at your own risk!
First off, all parts were purchased at Home Depot. The total bill ran me around $130 and that is with the light bulbs!

1.) First off, I bought a 2'x4' of MDF board. I chose the 1/2" wide one. This ran me like $6 and change. With this 2x4 board, I cut it up into 7"x7" squares. I think I got about 15+ squares out of the board. Next, I glued 3 of them together to give me a 1.5" thick in width.
Here, I am keeping them clamped down so they will take better.

2.) Next, I drilled 5 holes. One at each corner and one in the center. I got a nice CAD drawing by trolling around the blog referenced above. I will post it if I can find it again. I used a 1.5" drill bit for the holes.

Here are the holes all drilled out. Do yourself a favor and do this outside! It is messy. The MDF board flakes like no other.

3.) Now, I bought 5 of these rubber outdoor light sockets that are already wired up for you. These were around $2.60 each.
They fit the 1.5" hole snugly.

Here they are all in:

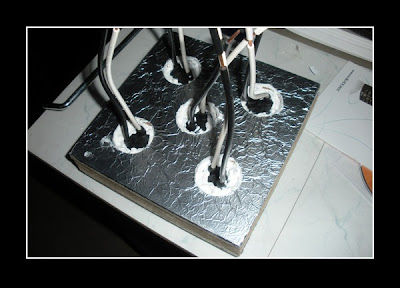
4.) Next, I took the sockets out for a moment and used aluminum foil and spray on adhesive to attach it to the front of the wood. This will bounce light off it and make the light reflect forward more.

5.) Next, construction adhesive was used to secure the sockets to the MDF board. I used "Power Grab" All Purpose Construction Adhesive. This was like $7 max
6.) Next, I bought a 4x4 conjunction box at around $4 and secured a wire secure thingy... I bought a 25' Extension cord ($8.88 for 25' !!!) and ripped off the female end. This is how I will get my power to the lights!
Here is the wire secure thingy:

7.) Next, I popped out all 5 of the inner circle thingys and drew the socket wires through them. This was pretty ghetto and the wires didn't fall into place perfectly. So the wires are bent and then go under the base of the conjunction box. I would have liked it if the bulbs were in the same spot as the circles on the conjunction box but whatever. I used the wire nuts to secure the wires together. They are like $5 a pack.

I don't have it pictured but I also bought 2 on/off toggle switches that turn the lights on and off. They ran about $6 each. One toggle switch controls three of the lights and the other one controls the other two lights. You need special light bulbs for a dimmer switch to work so this takes care of me being able to dim down the output of the lights by disabling two or three of them...
The easiest way to wire this is to do the following:
The extension cord has three wires: black, white and green (ground). I believe that in house wiring, black is the power ad white is common. So, I wire nutted ALL the whites together along with the green ground wire. The gauge of wire was too heavy for me to put all of them together in one so I had to daisy chain a wire between two of them to make them all fit while maintaining a connection. So the white and green wires from the extension cord paired up with a couple of the white wires from the sockets and then I had a stray white wire link the rest of the white wires to this one.
Now, the black wire completes the connection so you need to put the toggle switch in between these. The toggle switch connects or disconnects this wire so power can or cannot go through to the lights. I took the black wire from the extension cord and put two stray black wires off of that. These 2 stray wires will hook up to one of the toggle switch connections. I then took another 2 stray black wires and put them off of the other connector on the toggle switch. One stray wires then went to three of the black wires off the light sockets (you choose which ones you want that to affect) and then the other stray wire went to the remain 2 light sockets.
So the toggle switch makes or breaks a connection of power to the lights. One enables/disables three lights while the other affects the remaining two. Got it? Hopefully that isn't confusing at all. Just remember that the toggle switches need to be in between the extension cord and the light sockets and then you will be all good!
Here are the bulbs that I got. I think they were like $8 a piece and you need 5 of them. These take up a bulk of the price!

This was all I could find at the Depot that had the juice while being daylight balanced!
These are 100watts but are good on your wallet because they only draw 27watts. I think that is what that means. Note. They break easily so buy spares!
And here is the final shot of the lights in action:

Lastly, HOW DO WE GET THIS ON A LIGHTSTAND?
Unfortunately, this is where a big bulk of the money used on the project is dropped. I bought a dual sided screw. The one end was 1/4" and the other one is bigger and goes into wood. I think it was 3" long.
You screw the big boy into the bottom of the wood and then get yourself a $30 Bogen/Manfrotto Swivel Umbrella Adapter and that comes with a brass piece that takes 1/4" thread!
Then mount it all to a light stand and it's up!
Lastly, you will need light modifiers. I recommend using that umbrella adapter for all it's worth. Get yourself umbrellas and mount them on the umbrella adapter or get yourself the softboxes that collapse like an umbrella like this one made by Westcott. This one runs about $150 but it is the 28" Westcott Apollo Softbox. This can double for your off camera flash stuff so it can have dual purposes!
Thanks for checking it out and please be safe if you try this out ok? You are working with electricity here and electricity can hurt! I take no responsibility if you decide to play Frankenstein on yourself.
... I didn't think so. The cool thing about the Spiderlite is the fact that they provide consistent lighting so you can see the effect your lights are having on your subject and it can essentially be used just like how you would use window light. I wanted to give one of these a try and I saw how simple they are but I really did not want to pay that much!
So I got the idea to make one of my own since they literally just look like 5 light bulb sockets. I jumped on the computer and Googled "DIY Spiderlite" and came across a blog post by Alex Campagna. Why reinvent the wheel if someone else already did it right?
So here are some shots and a detailed description about what I did:
Caution. This will involve some electrical knowledge so don't try this unless you can do this without getting electrocuted! I take no responsibility if you burn down your house or electrocute yourself or anything like that so do this at your own risk!
First off, all parts were purchased at Home Depot. The total bill ran me around $130 and that is with the light bulbs!

1.) First off, I bought a 2'x4' of MDF board. I chose the 1/2" wide one. This ran me like $6 and change. With this 2x4 board, I cut it up into 7"x7" squares. I think I got about 15+ squares out of the board. Next, I glued 3 of them together to give me a 1.5" thick in width.
Here, I am keeping them clamped down so they will take better.

2.) Next, I drilled 5 holes. One at each corner and one in the center. I got a nice CAD drawing by trolling around the blog referenced above. I will post it if I can find it again. I used a 1.5" drill bit for the holes.

Here are the holes all drilled out. Do yourself a favor and do this outside! It is messy. The MDF board flakes like no other.

3.) Now, I bought 5 of these rubber outdoor light sockets that are already wired up for you. These were around $2.60 each.
They fit the 1.5" hole snugly.

Here they are all in:

4.) Next, I took the sockets out for a moment and used aluminum foil and spray on adhesive to attach it to the front of the wood. This will bounce light off it and make the light reflect forward more.

5.) Next, construction adhesive was used to secure the sockets to the MDF board. I used "Power Grab" All Purpose Construction Adhesive. This was like $7 max

6.) Next, I bought a 4x4 conjunction box at around $4 and secured a wire secure thingy... I bought a 25' Extension cord ($8.88 for 25' !!!) and ripped off the female end. This is how I will get my power to the lights!
Here is the wire secure thingy:

7.) Next, I popped out all 5 of the inner circle thingys and drew the socket wires through them. This was pretty ghetto and the wires didn't fall into place perfectly. So the wires are bent and then go under the base of the conjunction box. I would have liked it if the bulbs were in the same spot as the circles on the conjunction box but whatever. I used the wire nuts to secure the wires together. They are like $5 a pack.

I don't have it pictured but I also bought 2 on/off toggle switches that turn the lights on and off. They ran about $6 each. One toggle switch controls three of the lights and the other one controls the other two lights. You need special light bulbs for a dimmer switch to work so this takes care of me being able to dim down the output of the lights by disabling two or three of them...
The easiest way to wire this is to do the following:
The extension cord has three wires: black, white and green (ground). I believe that in house wiring, black is the power ad white is common. So, I wire nutted ALL the whites together along with the green ground wire. The gauge of wire was too heavy for me to put all of them together in one so I had to daisy chain a wire between two of them to make them all fit while maintaining a connection. So the white and green wires from the extension cord paired up with a couple of the white wires from the sockets and then I had a stray white wire link the rest of the white wires to this one.
Now, the black wire completes the connection so you need to put the toggle switch in between these. The toggle switch connects or disconnects this wire so power can or cannot go through to the lights. I took the black wire from the extension cord and put two stray black wires off of that. These 2 stray wires will hook up to one of the toggle switch connections. I then took another 2 stray black wires and put them off of the other connector on the toggle switch. One stray wires then went to three of the black wires off the light sockets (you choose which ones you want that to affect) and then the other stray wire went to the remain 2 light sockets.
So the toggle switch makes or breaks a connection of power to the lights. One enables/disables three lights while the other affects the remaining two. Got it? Hopefully that isn't confusing at all. Just remember that the toggle switches need to be in between the extension cord and the light sockets and then you will be all good!
Here are the bulbs that I got. I think they were like $8 a piece and you need 5 of them. These take up a bulk of the price!

This was all I could find at the Depot that had the juice while being daylight balanced!
These are 100watts but are good on your wallet because they only draw 27watts. I think that is what that means. Note. They break easily so buy spares!
And here is the final shot of the lights in action:

Lastly, HOW DO WE GET THIS ON A LIGHTSTAND?
Unfortunately, this is where a big bulk of the money used on the project is dropped. I bought a dual sided screw. The one end was 1/4" and the other one is bigger and goes into wood. I think it was 3" long.
You screw the big boy into the bottom of the wood and then get yourself a $30 Bogen/Manfrotto Swivel Umbrella Adapter and that comes with a brass piece that takes 1/4" thread!
Then mount it all to a light stand and it's up!
Lastly, you will need light modifiers. I recommend using that umbrella adapter for all it's worth. Get yourself umbrellas and mount them on the umbrella adapter or get yourself the softboxes that collapse like an umbrella like this one made by Westcott. This one runs about $150 but it is the 28" Westcott Apollo Softbox. This can double for your off camera flash stuff so it can have dual purposes!
Thanks for checking it out and please be safe if you try this out ok? You are working with electricity here and electricity can hurt! I take no responsibility if you decide to play Frankenstein on yourself.
Subscribe to:
Comments (Atom)